Using Photoshop Elements to the benefit of Postal History
Quote from Steve on September 15, 2020, 10:14 amI have been promising to write a tutorial on 'How to Use Photoshop Elements to create Postmarks' for some time.
In 2017 I wrtote to Prof. Alex Visser and asked him "Do you think there is any call for such a guide? It would be free and downloadable to computer literate philatelists..." Alex replied "I saw an article on how to Photoshop cancellations many years ago. Since then the technology has improved vastly. Would you have enough material for a guide document? Would you not wish to publish it in the SAP for a wider audience, as I imagine there will be wide interest." Despite Alex's encouragement, I was unable to proceed at that time. This philatelic project went into abeyance.
Now, with retirement and the Covid-19 lockdown, I have been able to start another long-postponed and complementary project, the South African Philately Club. As part of that bigger picture I have now begun to document how to use Photoshop Elements (PE) to the benefit of Postal History. Let me show you what can be done. If you like what you see and want to know more about doing this yourself, there is a step-by-step PE tutorial below.
1]. I attach a post card of Simonstown Station as purchased on eBay. It is creased and the corners dog-eared.
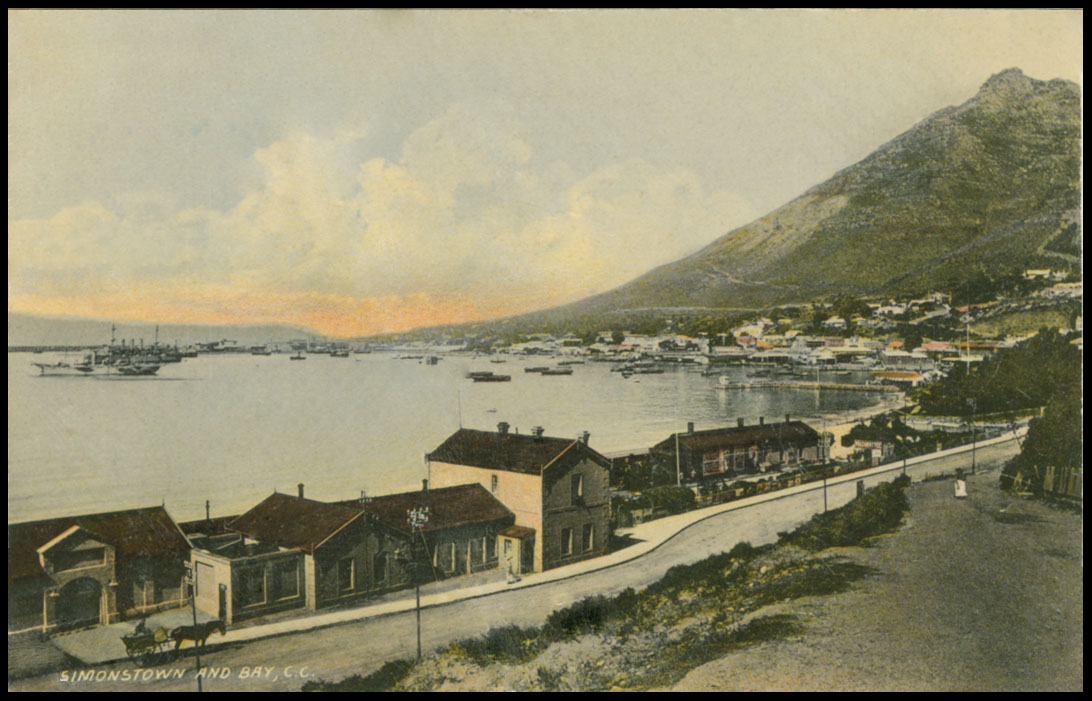
2]. The same postcard cleaned up in Photoshop and given a black background for display.
3]. An example of what can be done with postmarks. Once created, facsimile postmarks can be edited and re-used.
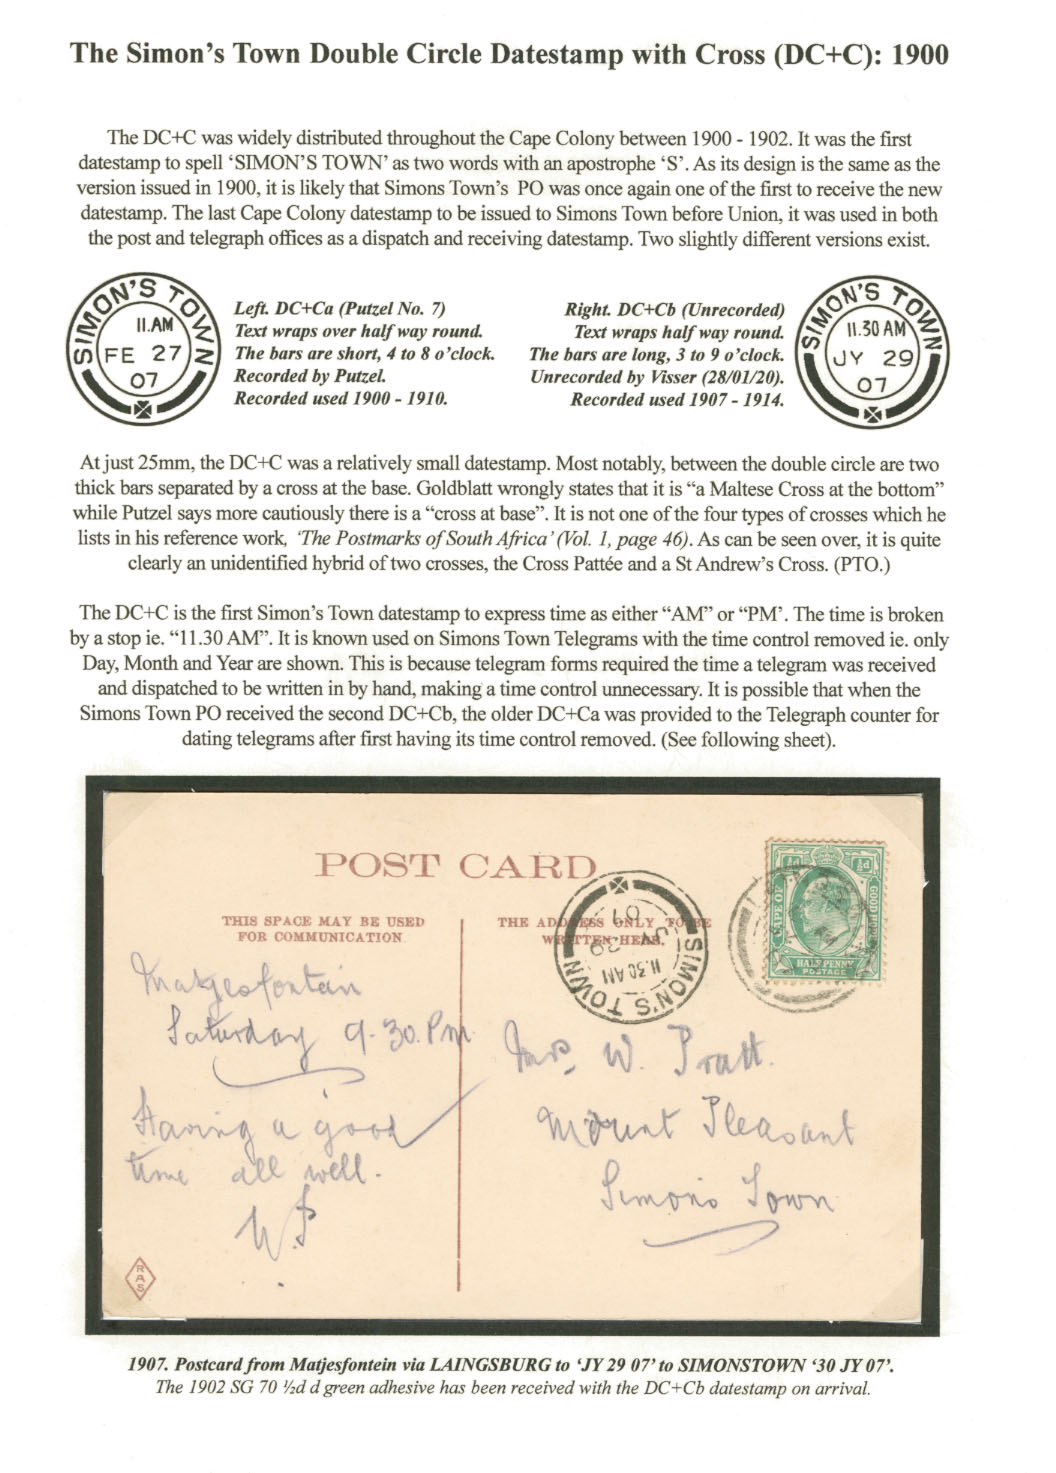
4]. This display sheet shows two similar datestamps. In trying to fit an existing facsimile of the Simonstown Double Circle with Cross datestamp over a scanned postmark image which I assumed (ASS - U - ME) was the same, I found that it did not fit. My first thought was that my facsimile postmark was wrong. It wasn't. I had discovered an entirely new and unrecorded Simonstown Double Circle with Cross datestamp. Club members who develop such facsimile postmarks in Photoshop could share them with each other.
5]. An example of using PE for technical illustration. See the "How to... " tutorial that follows.
I have been promising to write a tutorial on 'How to Use Photoshop Elements to create Postmarks' for some time.
In 2017 I wrtote to Prof. Alex Visser and asked him "Do you think there is any call for such a guide? It would be free and downloadable to computer literate philatelists..." Alex replied "I saw an article on how to Photoshop cancellations many years ago. Since then the technology has improved vastly. Would you have enough material for a guide document? Would you not wish to publish it in the SAP for a wider audience, as I imagine there will be wide interest." Despite Alex's encouragement, I was unable to proceed at that time. This philatelic project went into abeyance.
Now, with retirement and the Covid-19 lockdown, I have been able to start another long-postponed and complementary project, the South African Philately Club. As part of that bigger picture I have now begun to document how to use Photoshop Elements (PE) to the benefit of Postal History. Let me show you what can be done. If you like what you see and want to know more about doing this yourself, there is a step-by-step PE tutorial below.
1]. I attach a post card of Simonstown Station as purchased on eBay. It is creased and the corners dog-eared.
2]. The same postcard cleaned up in Photoshop and given a black background for display.
3]. An example of what can be done with postmarks. Once created, facsimile postmarks can be edited and re-used.
4]. This display sheet shows two similar datestamps. In trying to fit an existing facsimile of the Simonstown Double Circle with Cross datestamp over a scanned postmark image which I assumed (ASS - U - ME) was the same, I found that it did not fit. My first thought was that my facsimile postmark was wrong. It wasn't. I had discovered an entirely new and unrecorded Simonstown Double Circle with Cross datestamp. Club members who develop such facsimile postmarks in Photoshop could share them with each other.
5]. An example of using PE for technical illustration. See the "How to... " tutorial that follows.
Uploaded files: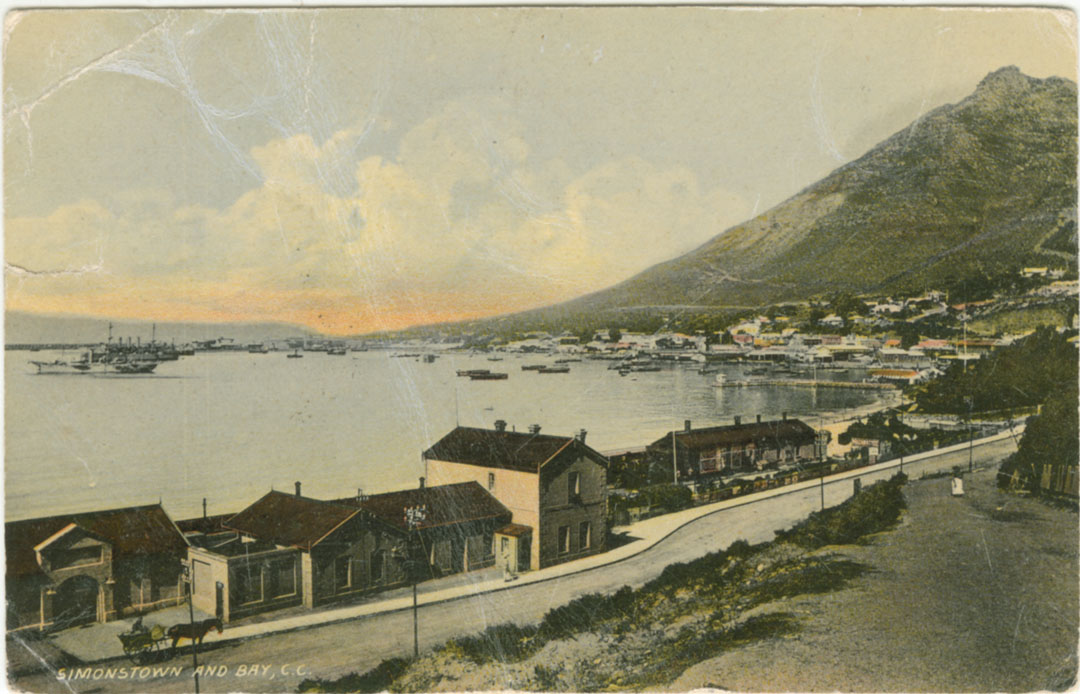
Quote from yannisl on September 16, 2020, 11:35 amSteve
Your example is beautifully done and I would be interested to hear about step by step process. Most graphics software use the same terminology. So a quick step by step summary will do. Personally I use GIMP, which is open source software. My earlier comment on tracing the postmarks by hand, is that this is still probably the faster way, but maybe just for me based on my background as an Engineer.
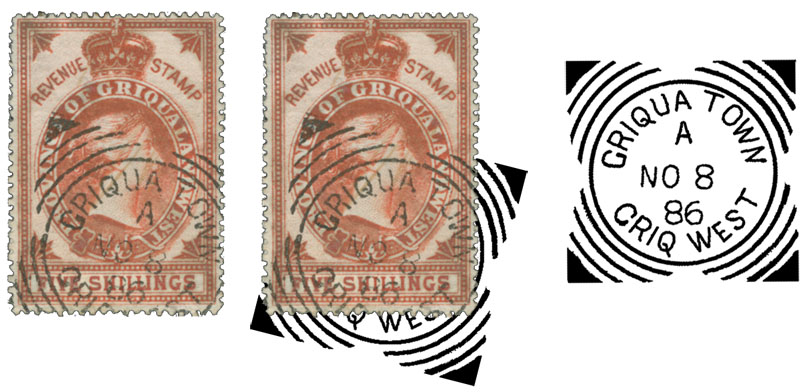
The Griqua Town postmark is elusive. It is probably of British Origin.
If technology is tyranny, I am not too sure. It is both liberating and tyrannical.
Steve
Your example is beautifully done and I would be interested to hear about step by step process. Most graphics software use the same terminology. So a quick step by step summary will do. Personally I use GIMP, which is open source software. My earlier comment on tracing the postmarks by hand, is that this is still probably the faster way, but maybe just for me based on my background as an Engineer.
The Griqua Town postmark is elusive. It is probably of British Origin.
If technology is tyranny, I am not too sure. It is both liberating and tyrannical.
Quote from Steve on September 16, 2020, 1:07 pmYannis, I have changed this Forum to 'Technology', plain and simple.
I am sure you can do much the same in GIMP and for that reason I would suggest that you stick with what you know. It will certainly not be quicker to use PE in the beginning. It does have its annoying quirks. However, if someone else wanted to start using a graphics program from scratch, it would be a better place to start than many similar programs because it is a long-established product with a wealth of information AND HELP supporting it on the internet.
Ian Paterson, a ZAR / Transvaal Bourne head collector, told me that the Griqua Town stamp is probably telegraphically used. I have no reason to doubt that.
After realising I was not a team player and no-one in SA would employ me, I started my own business. I have spent most of my life working with computers in one form or another. In 1981 I started South Africa's first proper PC magazines. Jamie may be pleased to know that Iwas invited to the SA launch of the IBM PC in the Carlton Centre in about 1983 where I ate salmon and capers for the first time and went home with a handful of matchbboks from the launch. I still have several in my retirement pot.
As part of a deal to sell my computer magazine business to Naspers I had to sign a restraint on trade. This lead me to go into freelance journalism as the Cape Town stringer for the Financial Mail's Computer Mail supplement. As the work was infrequent I supplemented my income by doing some Public Relations, something I discovered I was very good at. I was working as a PR freelancer when I met the directors of Pink Software in Cape Town at a Punchline dealer promotion. They had heard about me as the publisher of PC magazines and asked me to come to Jo'burg for a job interview. This entailed having dinner with the directors and their wives. I could write a lot about Pink Software. It was a great time of my life. All the guys were called 'Jim'. Our given names were seldom used, even the directors. The Marketing Director was Eric Annegarn whom I admired and liked a lot. He was the creative inspiration at Pink Software and we worked well together. However..... one day, Eric and I began jostling each other in the foyer of Pink Software's Greenside offices. This resulted in us rolling around on the carpet when a customer walked in. Phillip Copeman, the charismatic managing director of Pink Software, had come out of his office to see what the commotion was about. Philip saw us on the floor and pointing at Eric he said to the customer "He was asking for technical support! Don't ask for technical support!". I was fired three times from Pink Software! The third time I started my own software publishing business in the UK. The truth is I am no computer expert. I have always winged it.
Yannis, I have changed this Forum to 'Technology', plain and simple.
I am sure you can do much the same in GIMP and for that reason I would suggest that you stick with what you know. It will certainly not be quicker to use PE in the beginning. It does have its annoying quirks. However, if someone else wanted to start using a graphics program from scratch, it would be a better place to start than many similar programs because it is a long-established product with a wealth of information AND HELP supporting it on the internet.
Ian Paterson, a ZAR / Transvaal Bourne head collector, told me that the Griqua Town stamp is probably telegraphically used. I have no reason to doubt that.
After realising I was not a team player and no-one in SA would employ me, I started my own business. I have spent most of my life working with computers in one form or another. In 1981 I started South Africa's first proper PC magazines. Jamie may be pleased to know that Iwas invited to the SA launch of the IBM PC in the Carlton Centre in about 1983 where I ate salmon and capers for the first time and went home with a handful of matchbboks from the launch. I still have several in my retirement pot.

As part of a deal to sell my computer magazine business to Naspers I had to sign a restraint on trade. This lead me to go into freelance journalism as the Cape Town stringer for the Financial Mail's Computer Mail supplement. As the work was infrequent I supplemented my income by doing some Public Relations, something I discovered I was very good at. I was working as a PR freelancer when I met the directors of Pink Software in Cape Town at a Punchline dealer promotion. They had heard about me as the publisher of PC magazines and asked me to come to Jo'burg for a job interview. This entailed having dinner with the directors and their wives. I could write a lot about Pink Software. It was a great time of my life. All the guys were called 'Jim'. Our given names were seldom used, even the directors. The Marketing Director was Eric Annegarn whom I admired and liked a lot. He was the creative inspiration at Pink Software and we worked well together. However..... one day, Eric and I began jostling each other in the foyer of Pink Software's Greenside offices. This resulted in us rolling around on the carpet when a customer walked in. Phillip Copeman, the charismatic managing director of Pink Software, had come out of his office to see what the commotion was about. Philip saw us on the floor and pointing at Eric he said to the customer "He was asking for technical support! Don't ask for technical support!". I was fired three times from Pink Software! The third time I started my own software publishing business in the UK. The truth is I am no computer expert. I have always winged it.
Quote from Steve on September 16, 2020, 6:33 pmTUTORIAL - HOW TO RECREATE A POSTMARK IN PHOTOSHOP ELEMENTS - Updated 20/09/2020.
I am often asked how I recreate postmarks. I use Adobe Photoshop Elements 12 (2013) which is now a bit old. Photoshop Elements (PE) is a cut-down version of a more powerful, more expensive professional graphics program.
There have been several updates to PE since I bought my copy for about GBP £79. This old version does everything I need. The updated versions of PE have not added anything I need nor have they significantly altered the look of the software ie. if your version of PE is newer than mine, you will still be able to follow the steps in this tutorial.
7-DAY TRIAL PROGRAM
If you want to test PE before buying it, you can. There is a 7-day working demo of the program which can be downloaded from the internet. If you download the program you can test it for seven days with the Tutorial below. Many people make the mistake of downloading limited trial software before they are ready to use it. By the time they come to try it out, it has expired. DO NOT DOWNLOAD THE PROGRAM UNTIL YOU ARE GOING TO USE IT.
Depending on where you live, you may be required to download the PE trial from another region. This requirement is a pain in the ass!
Download a Photoshop Elements Trial Program here:
UK: https://www.adobe.com/uk/fragments/textandimage/elements/Elements-Trials-family.html
The essential steps in using PE to recreate a postmark are:
1]. Scan the image.
Scanning at 600dpi will allow you to Zoom in at greater magnification later. You need detail if you are to accurately recreate the image (postmark).2]. Crop the Image.
You only require to work on that part of the scanned image that shows all the original postmark.3]. Arrange some Layers.
Think of the top layer as the tracing paper on which you will draw over the bottom Background image.4]. Zoom into the Image
You need to work to the maximim size of the full image on screen in order to get an accurate reproduction.5]. Draw the Circle (s)
This is easi;ly done using Guide Lines and a Circle (elliptical) darwing tool.6]. Zoom into and trace-over the Text
In recreating text you need to see as much detail of it as possible if you are to be at all accurate.There can be many a slip twixt 1 and 6. If you want to attempt to do this, I have expanded on this advice in a step-by-step tutorial, below. It will, hopefully, allow those with PE to learn from my experience, which included many mistakes and much frustration while recreating hundreds of Cape and South African postmarks. While there are other software products that you can use to do this, I can only provide you with advice on what I use and know best.
TUTORIAL - HOW TO RECREATE A POSTMARK IN PHOTOSHOP ELEMENTS - Updated 20/09/2020.
I am often asked how I recreate postmarks. I use Adobe Photoshop Elements 12 (2013) which is now a bit old. Photoshop Elements (PE) is a cut-down version of a more powerful, more expensive professional graphics program.
There have been several updates to PE since I bought my copy for about GBP £79. This old version does everything I need. The updated versions of PE have not added anything I need nor have they significantly altered the look of the software ie. if your version of PE is newer than mine, you will still be able to follow the steps in this tutorial.
7-DAY TRIAL PROGRAM
If you want to test PE before buying it, you can. There is a 7-day working demo of the program which can be downloaded from the internet. If you download the program you can test it for seven days with the Tutorial below. Many people make the mistake of downloading limited trial software before they are ready to use it. By the time they come to try it out, it has expired. DO NOT DOWNLOAD THE PROGRAM UNTIL YOU ARE GOING TO USE IT.
Depending on where you live, you may be required to download the PE trial from another region. This requirement is a pain in the ass!
Download a Photoshop Elements Trial Program here:
UK: https://www.adobe.com/uk/fragments/textandimage/elements/Elements-Trials-family.html
The essential steps in using PE to recreate a postmark are:
1]. Scan the image.
Scanning at 600dpi will allow you to Zoom in at greater magnification later. You need detail if you are to accurately recreate the image (postmark).
2]. Crop the Image.
You only require to work on that part of the scanned image that shows all the original postmark.
3]. Arrange some Layers.
Think of the top layer as the tracing paper on which you will draw over the bottom Background image.
4]. Zoom into the Image
You need to work to the maximim size of the full image on screen in order to get an accurate reproduction.
5]. Draw the Circle (s)
This is easi;ly done using Guide Lines and a Circle (elliptical) darwing tool.
6]. Zoom into and trace-over the Text
In recreating text you need to see as much detail of it as possible if you are to be at all accurate.
There can be many a slip twixt 1 and 6. If you want to attempt to do this, I have expanded on this advice in a step-by-step tutorial, below. It will, hopefully, allow those with PE to learn from my experience, which included many mistakes and much frustration while recreating hundreds of Cape and South African postmarks. While there are other software products that you can use to do this, I can only provide you with advice on what I use and know best.
Quote from Steve on September 17, 2020, 9:53 amPHOTOSHOP ELEMENTS POSTMARK TUTORIAL 1/9 - Updated 20/09/2020.
1]. Scan the image.
You can scan from inside Photoshop Elements (PS) using the File > Import command.This will bring up a Scan dialogue box relevant to your scanner. I have an Epson Perfection 4870 Photo scanner. In PE, the Epson Scan dialogue box offers a wide range of scanning controls, most importantly Image Type (ie. 24-bit Color, etc), Resolution (ie. 600 dpi), Descreening, etc. It also allows you to screen all our part of the image placed in the scanner. After scanning, this Scan dialogue box must be closed before you can contine working in PE.
Alternatively, you can Open a previously scanned image in the File menu.
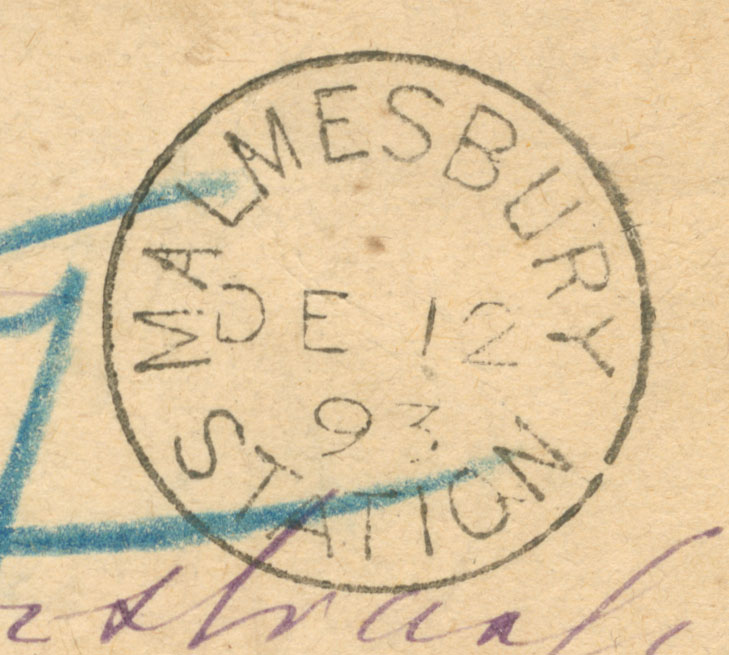
Below is a postcard whose MALMESBURY single circle datestamp I am going to recreate in PE.
PLEASE NOTE: If you are doing this tutorial, you can download a high resolution image of the postmark to work on. See 2/8 below.
PHOTOSHOP ELEMENTS POSTMARK TUTORIAL 1/9 - Updated 20/09/2020.
1]. Scan the image.
You can scan from inside Photoshop Elements (PS) using the File > Import command.
This will bring up a Scan dialogue box relevant to your scanner. I have an Epson Perfection 4870 Photo scanner. In PE, the Epson Scan dialogue box offers a wide range of scanning controls, most importantly Image Type (ie. 24-bit Color, etc), Resolution (ie. 600 dpi), Descreening, etc. It also allows you to screen all our part of the image placed in the scanner. After scanning, this Scan dialogue box must be closed before you can contine working in PE.
Alternatively, you can Open a previously scanned image in the File menu.
Below is a postcard whose MALMESBURY single circle datestamp I am going to recreate in PE.
PLEASE NOTE: If you are doing this tutorial, you can download a high resolution image of the postmark to work on. See 2/8 below.
Uploaded files: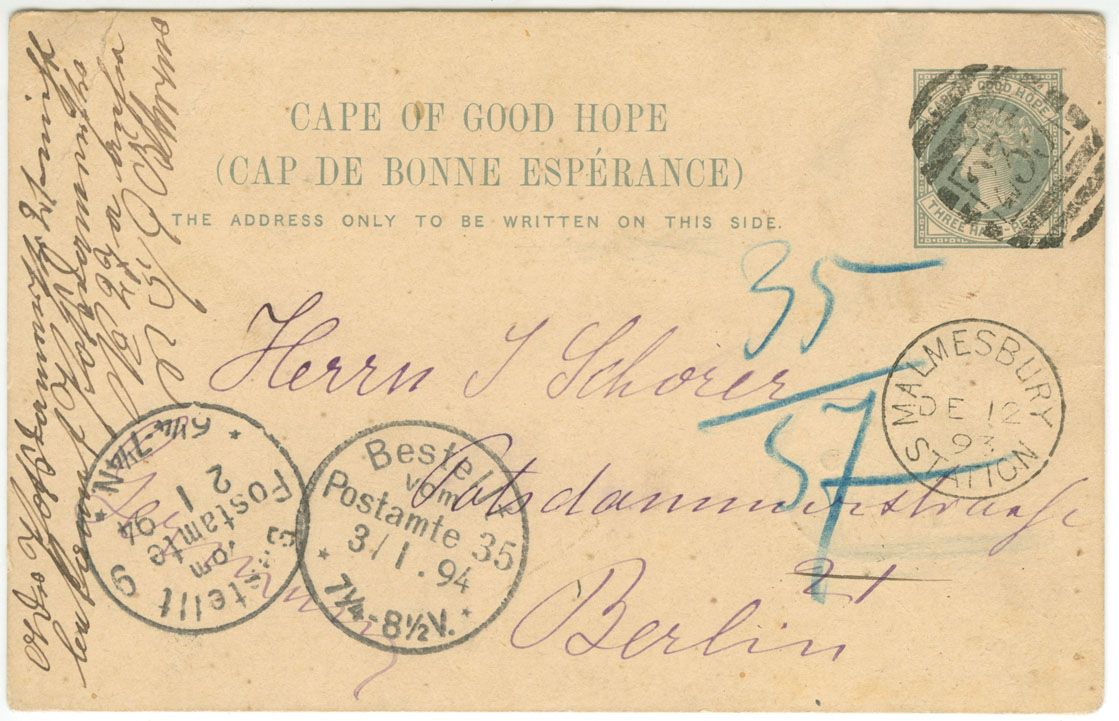
Quote from Steve on September 17, 2020, 10:12 amPHOTOSHOP ELEMENTS POSTMARK TUTORIAL 2/9 - Updated 20/09/2020.
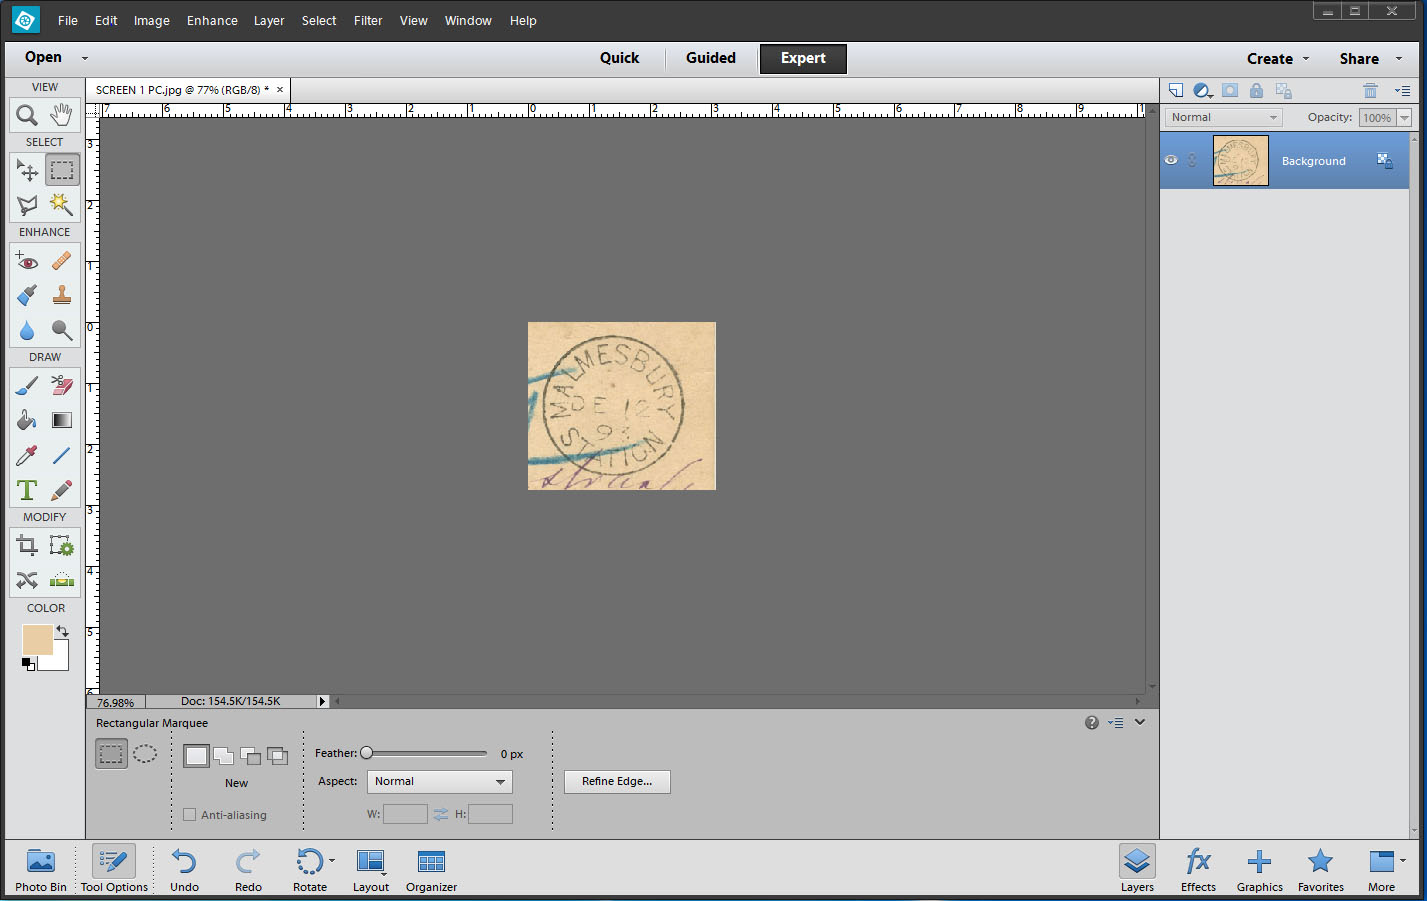
PLEASE NOTE: You can download a high resolution image of the cropped postmark to work on.
How to Download the Image to be used in this Tutorial
Using your Right Mouse key, click on the bottom-most image below showing the cropped scanned postmark.
Click on Save Image As. A standard Windows Save As dialogue box comes up.
Select where you want to Save your image and give it a file name meaningful to you or accept the default.
The image is a 600 dpi 24-bit Colour JPG file. Make a note of where you saved it.
The following tutorial instruction describes how to create the cropped image you have downloaded for use here. READ BUT DO NOT FOLLOW THE INSTRUCTIONS BELOW IF YOU HAVE DOWNLOADED THE IMAGE.
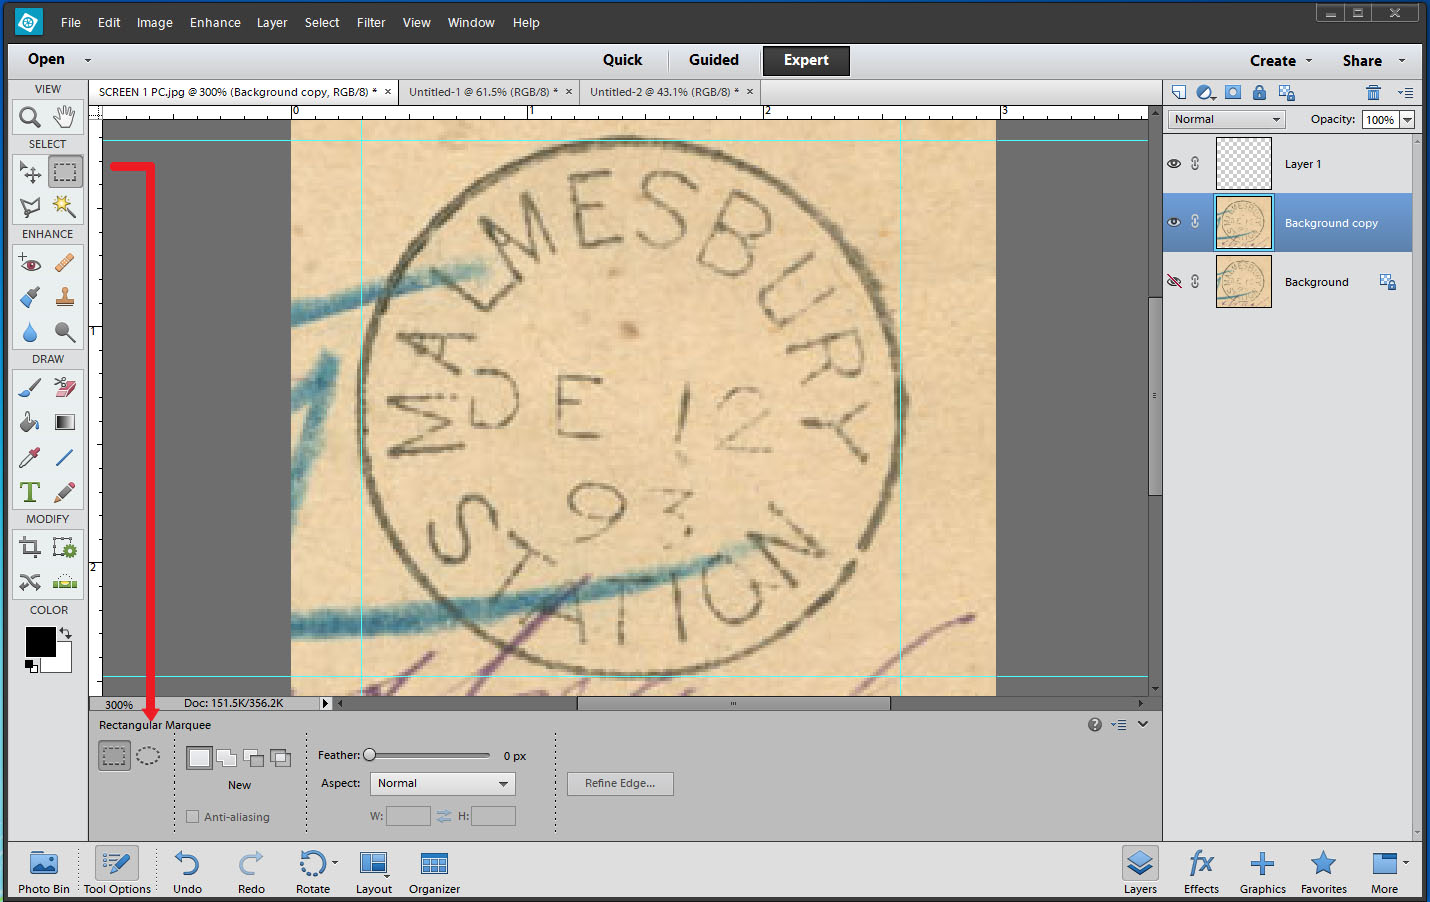
2]. How to Crop the Image.
You only require that part of the scanned image that shows all the original postmark.In the Select Tool Box (top left), select the Rectangular Marquee Tool. Place the cursor to the top left of the postmark and drag a box around the image to be worked on. Give yourself a little space around the edges.
Once you have placed a box around the Image, select Image > Crop.
You will now be left with the selected area of the postcard containing the postmark.
If an area remains selected, ie, highlighted, you need to switch it off before proceeding. Go to Select > Deselect
PHOTOSHOP ELEMENTS POSTMARK TUTORIAL 2/9 - Updated 20/09/2020.
PLEASE NOTE: You can download a high resolution image of the cropped postmark to work on.
How to Download the Image to be used in this Tutorial
Using your Right Mouse key, click on the bottom-most image below showing the cropped scanned postmark.
Click on Save Image As. A standard Windows Save As dialogue box comes up.
Select where you want to Save your image and give it a file name meaningful to you or accept the default.
The image is a 600 dpi 24-bit Colour JPG file. Make a note of where you saved it.
The following tutorial instruction describes how to create the cropped image you have downloaded for use here. READ BUT DO NOT FOLLOW THE INSTRUCTIONS BELOW IF YOU HAVE DOWNLOADED THE IMAGE.
2]. How to Crop the Image.
You only require that part of the scanned image that shows all the original postmark.
In the Select Tool Box (top left), select the Rectangular Marquee Tool. Place the cursor to the top left of the postmark and drag a box around the image to be worked on. Give yourself a little space around the edges.
Once you have placed a box around the Image, select Image > Crop.
You will now be left with the selected area of the postcard containing the postmark.
If an area remains selected, ie, highlighted, you need to switch it off before proceeding. Go to Select > Deselect
Uploaded files: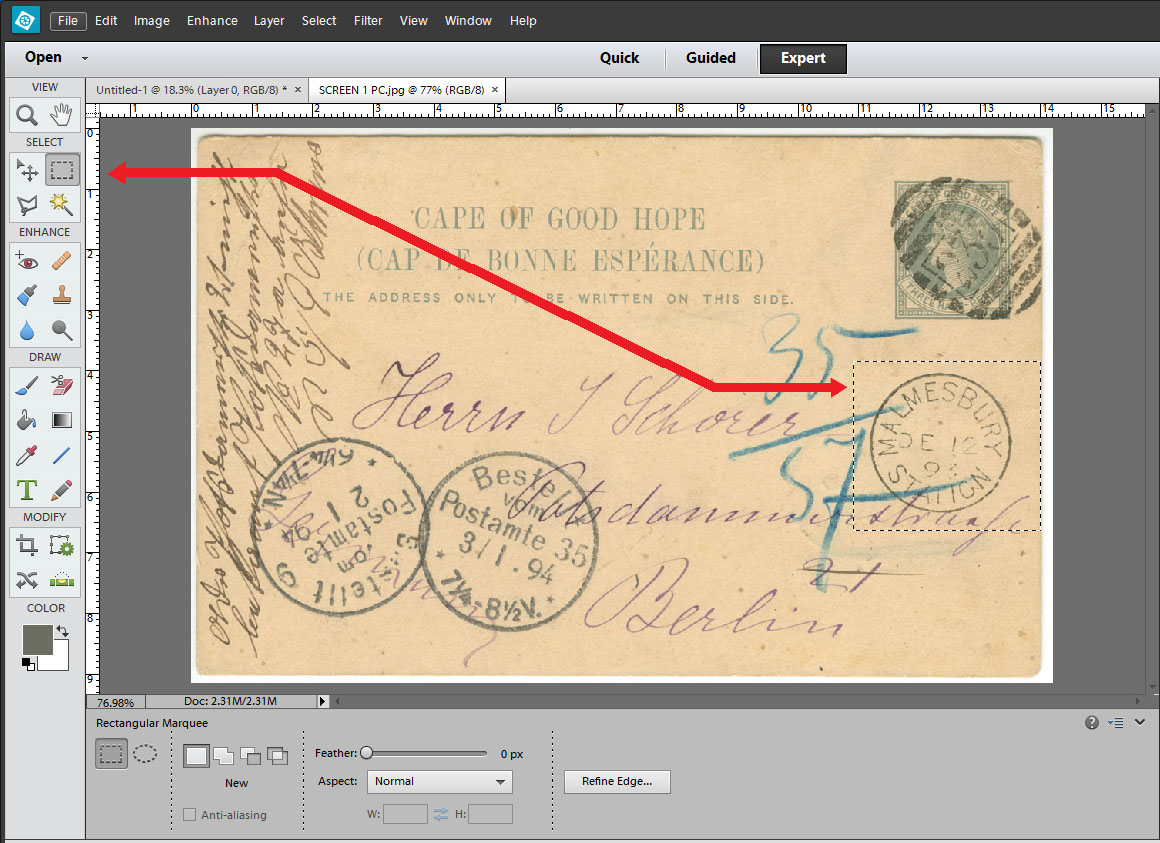
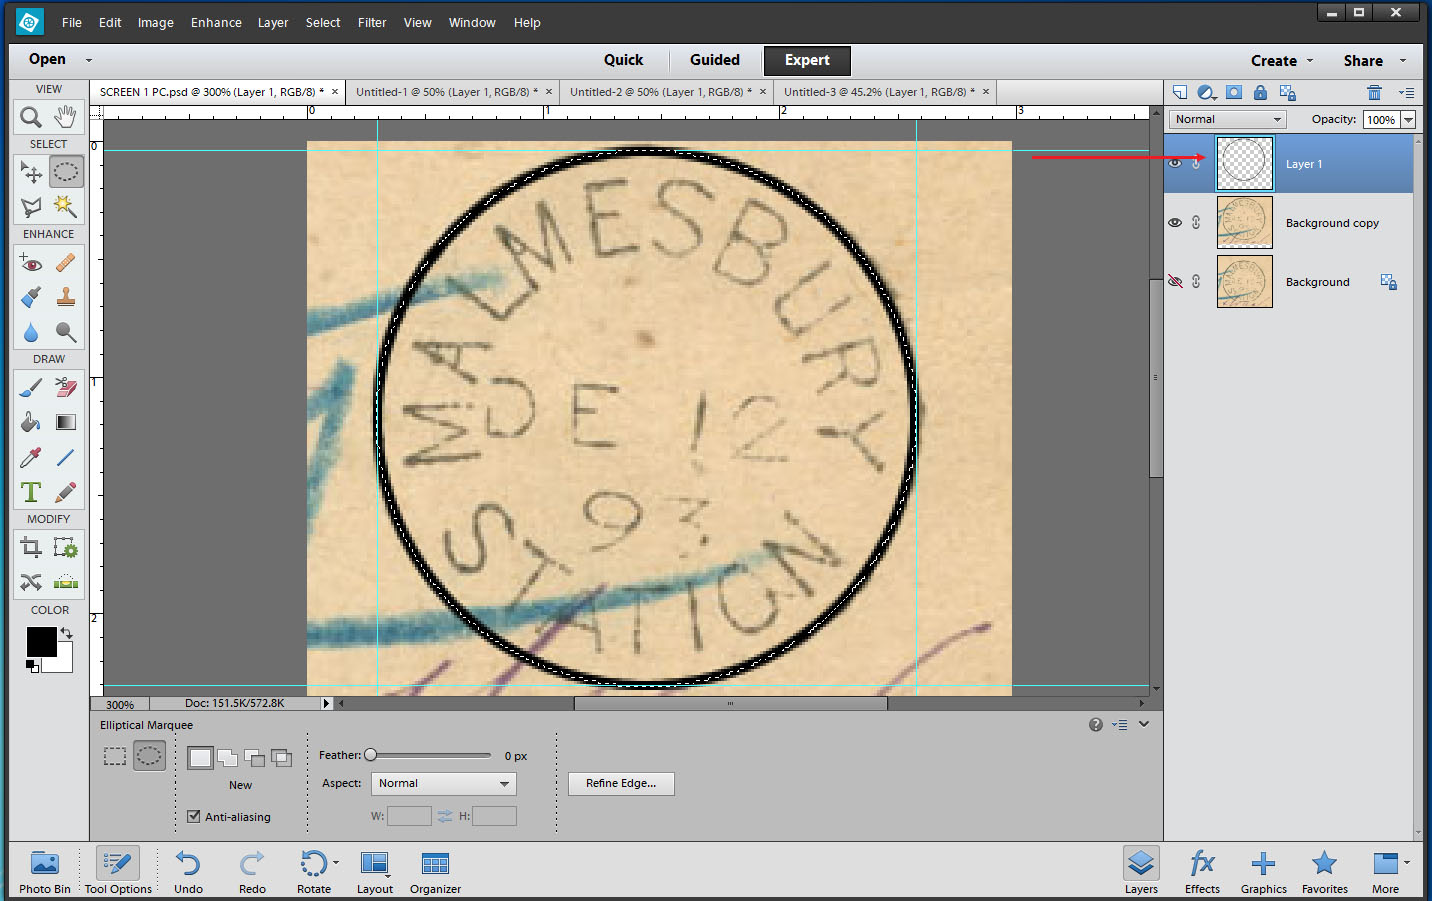
Quote from Steve on September 17, 2020, 10:54 amPHOTOSHOP ELEMENTS POSTMARK TUTORIAL 3/9 - Updated 20/09/2020.
Load the Image you Downloaded.
Refer to your note of where you stored the downloaded file.
Go to File > Open. Click on the image OR specify the path and file name and click on Open.
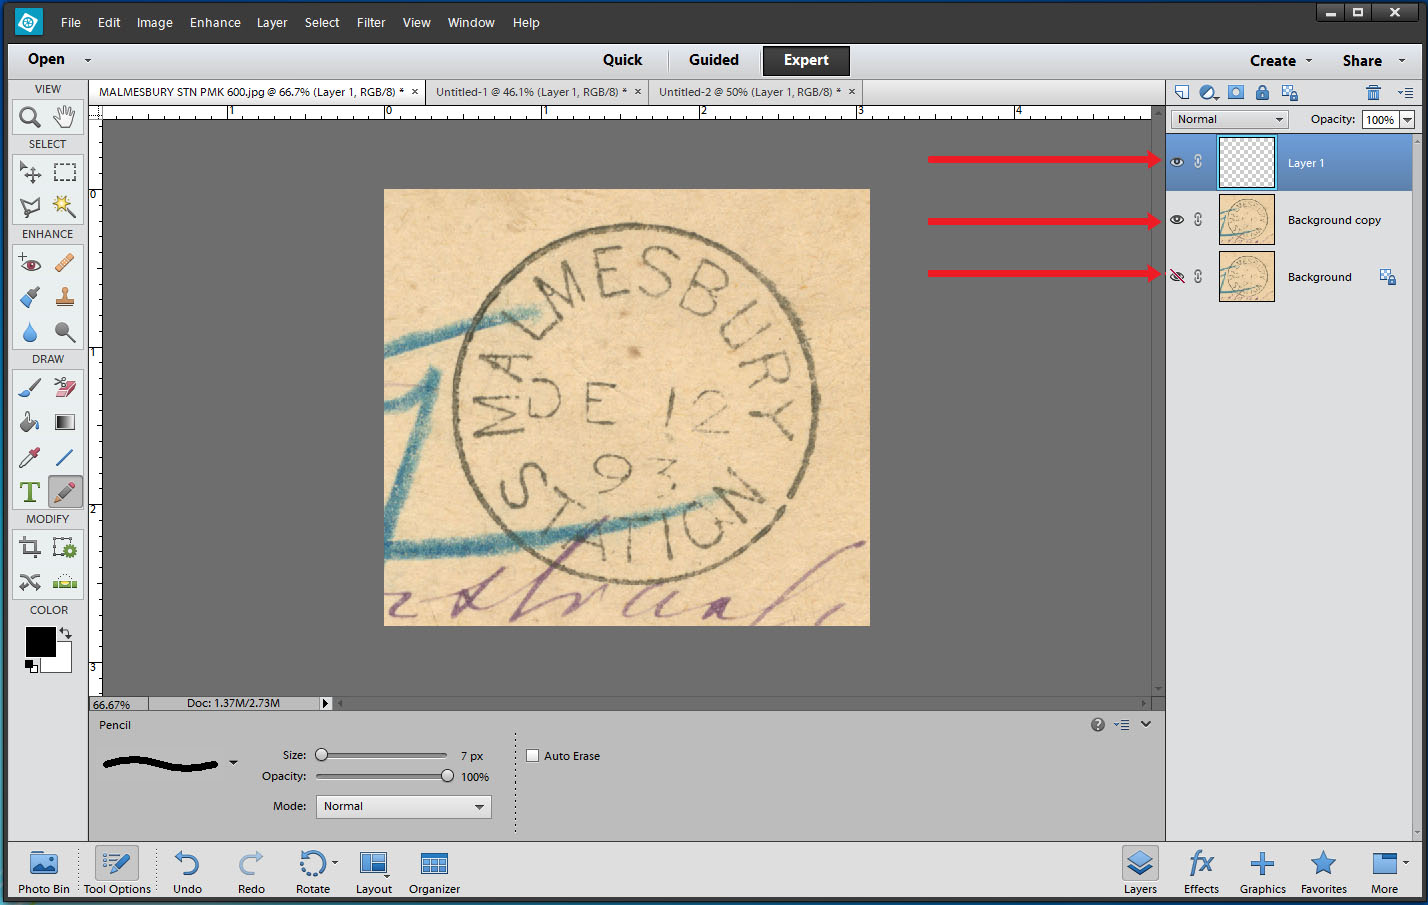
The downloaded file shows on the workscreen. See top image below. A thumbnail on a blue background appears on the top right.
NOTE: If you cannot see the thumbnail with a blue background at right, go to Window > Layers and click on it.
When a layer is highlighted in BLUE its means that it is the active layer which will be drawn on. Typically, you do not want to draw on the Background but on a separate layer.
3]. Arrange some Layers.
Two or three layers will be enough for a simple postmark like this.When you scan an image or bring one in, it will become the Background image. You do not want to work on this. You want to trace over this image and be able to extract your tracing separately from the Background. Layers allow you to separate your tracing from the Background. It is a good idea to create a duplicate background layer while keeping the original Background layer locked and inviolate.
In the Layer menu, (top), select Duplicate Layer. Accept the default Background copy by pressing OK.
In the Layer menu, (top), select New > Layer and press OK for Layer 1 in the dialogue box that appears.
Layer 1 appears at the top of the Layer Window (right). It is highlighted in BLUE. This means that it is the active layer. If you draw on the screen ie. trace over the postmark, whatever you draw will now be saved on Layer 1.
Click on the EYE to the left of the bottom Background thumbnail. A diagonal red line appears over it. The Background layer is now Locked. To Unlock a layer, click on the locked red-crossed EYE.
You need to keep a vigilant eye on the layer you are working on. PE can sometimes change them unexpectedly.
There is a lot more to Layers than this. They are a powerful and useful arrangement tool.
PHOTOSHOP ELEMENTS POSTMARK TUTORIAL 3/9 - Updated 20/09/2020.
Load the Image you Downloaded.
Refer to your note of where you stored the downloaded file.
Go to File > Open. Click on the image OR specify the path and file name and click on Open.
The downloaded file shows on the workscreen. See top image below. A thumbnail on a blue background appears on the top right.
NOTE: If you cannot see the thumbnail with a blue background at right, go to Window > Layers and click on it.
When a layer is highlighted in BLUE its means that it is the active layer which will be drawn on. Typically, you do not want to draw on the Background but on a separate layer.
3]. Arrange some Layers.
Two or three layers will be enough for a simple postmark like this.
When you scan an image or bring one in, it will become the Background image. You do not want to work on this. You want to trace over this image and be able to extract your tracing separately from the Background. Layers allow you to separate your tracing from the Background. It is a good idea to create a duplicate background layer while keeping the original Background layer locked and inviolate.
In the Layer menu, (top), select Duplicate Layer. Accept the default Background copy by pressing OK.
In the Layer menu, (top), select New > Layer and press OK for Layer 1 in the dialogue box that appears.
Layer 1 appears at the top of the Layer Window (right). It is highlighted in BLUE. This means that it is the active layer. If you draw on the screen ie. trace over the postmark, whatever you draw will now be saved on Layer 1.
Click on the EYE to the left of the bottom Background thumbnail. A diagonal red line appears over it. The Background layer is now Locked. To Unlock a layer, click on the locked red-crossed EYE.
You need to keep a vigilant eye on the layer you are working on. PE can sometimes change them unexpectedly.
There is a lot more to Layers than this. They are a powerful and useful arrangement tool.
Uploaded files: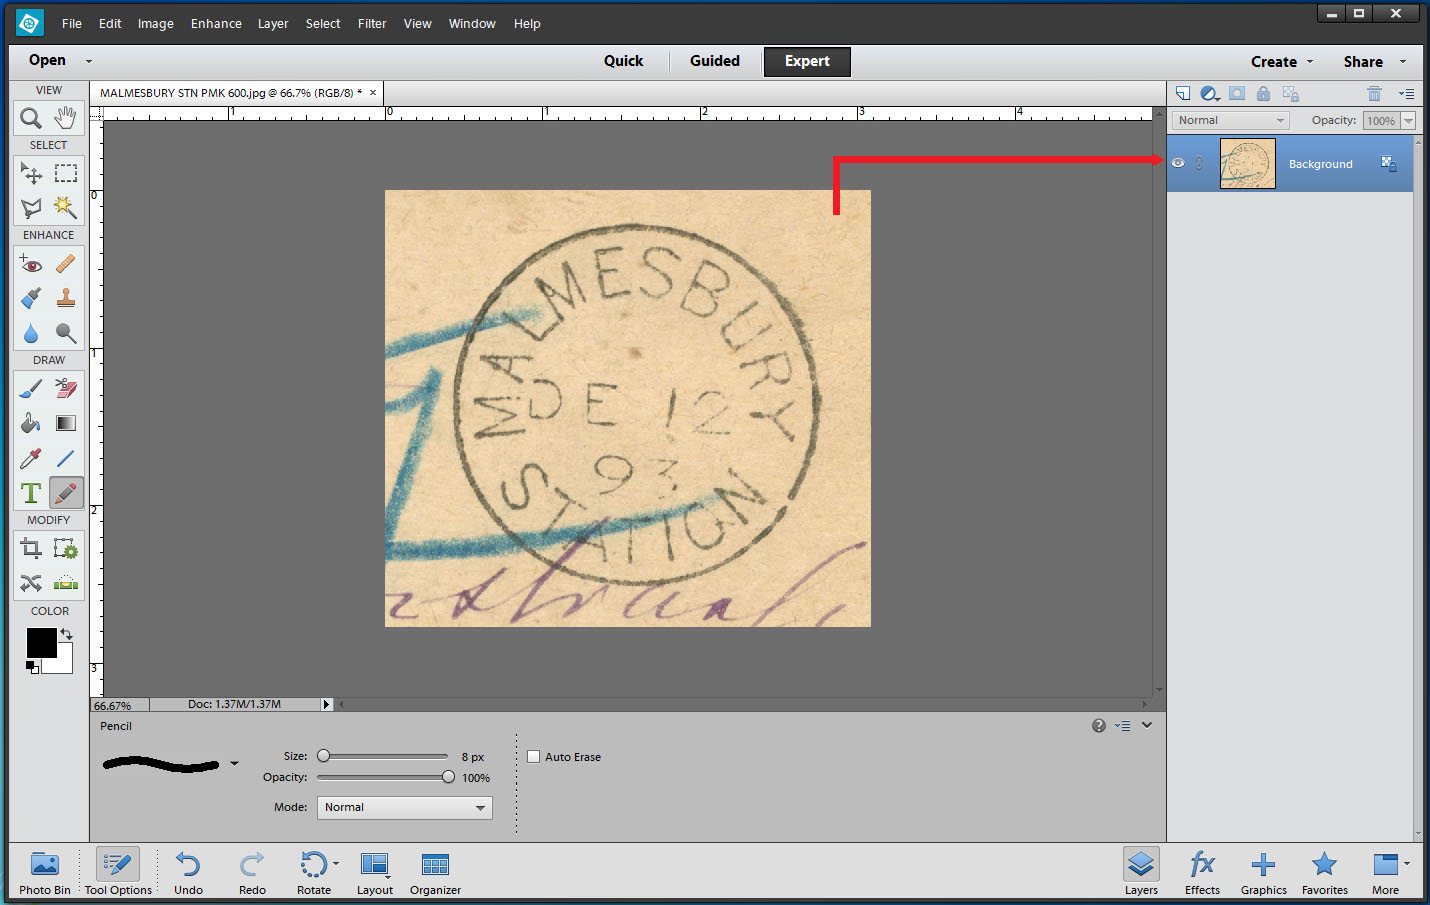
Quote from Steve on September 17, 2020, 11:01 amPHOTOSHOP ELEMENTS POSTMARK TUTORIAL 4/9
4]. Zoom into the Image
Most of you will not need much if any instruction in this.To Zoom In, go to the Magnifying Glass icon top right. Double Click on it once and place it in the centre of where you want to Zoom In. Press your left mouse key until you have achieved the level of magnification you need.
To Zoom Out, click on the Magnifying Glass icon bottom right, (the one with the - minus in the centre), and place it in the centre of where you want to Zoom Out. Press your left mouse key until you have achieved the level of de-magnification you need.
To go back to a full-screen view, go to View > Fit On Screen. This also has Zoom In and Out functions.
In the image below, I have zoomed into the image. I have centred it on the work screen by clicking on the Move Tool, second from top left, clicking within the image so that it is selected and pressing on the keyboard Up direction arrow key until it was in the centre of the workspace.
Using the Move tool, one can drag the image into position. This can be a bit ham-fisted. For small movements, using Move in conjunction with a directional arrow allows for fine adjustments.
PHOTOSHOP ELEMENTS POSTMARK TUTORIAL 4/9
4]. Zoom into the Image
Most of you will not need much if any instruction in this.
To Zoom In, go to the Magnifying Glass icon top right. Double Click on it once and place it in the centre of where you want to Zoom In. Press your left mouse key until you have achieved the level of magnification you need.
To Zoom Out, click on the Magnifying Glass icon bottom right, (the one with the - minus in the centre), and place it in the centre of where you want to Zoom Out. Press your left mouse key until you have achieved the level of de-magnification you need.
To go back to a full-screen view, go to View > Fit On Screen. This also has Zoom In and Out functions.
In the image below, I have zoomed into the image. I have centred it on the work screen by clicking on the Move Tool, second from top left, clicking within the image so that it is selected and pressing on the keyboard Up direction arrow key until it was in the centre of the workspace.
Using the Move tool, one can drag the image into position. This can be a bit ham-fisted. For small movements, using Move in conjunction with a directional arrow allows for fine adjustments.
Uploaded files: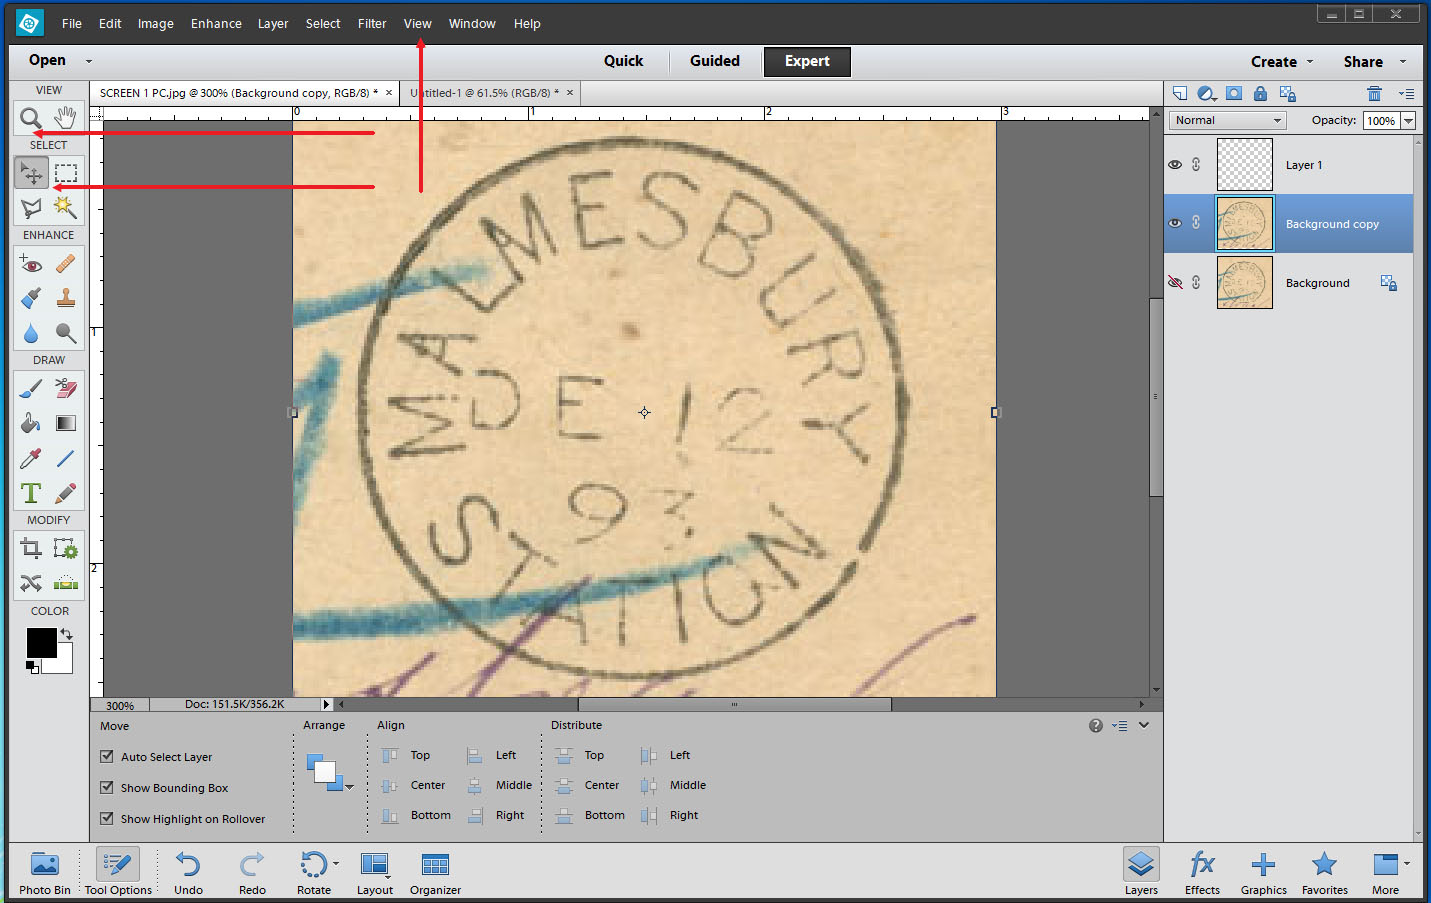
Quote from Steve on September 17, 2020, 11:34 amPHOTOSHOP ELEMENTS POSTMARK TUTORIAL 5/9
5]. Drag Guide Lines
Guide Lines are vertical and horizontal lines that can be dragged and positioned over the image. The default colour of Guide Lines is light blue.If you have, say, a postcard or a cover that has been scanned in a little skew, you can drag a Guide Line over the top of it and then after selecting the postcard you can Rotate it so that is level or square with the Guide Line.
Guide Lines are found in the Rulers above the Top and on the Left of the work screen edge. Using the Move Tool, simply click inside the ruler and while holding the left mouse key down drag a Guide Line to where you want to position it. We are going to position four Guide Lines on the inside centres of the circle. Simply drag these over the top, bottom and left and right sides of the postmark's outer circle, effectively creating a square around it.
In the image below, the red lines show where the Guide Lines have been dragged from, left for vertical and top for horizontal. The small red arrows point to where the Guide Lines have been positioned on the postmark's circle. If you have zoomed in far enough, you can carefully place each guide line into the centre of the postmark's outer circle line.
PHOTOSHOP ELEMENTS POSTMARK TUTORIAL 5/9
5]. Drag Guide Lines
Guide Lines are vertical and horizontal lines that can be dragged and positioned over the image. The default colour of Guide Lines is light blue.
If you have, say, a postcard or a cover that has been scanned in a little skew, you can drag a Guide Line over the top of it and then after selecting the postcard you can Rotate it so that is level or square with the Guide Line.
Guide Lines are found in the Rulers above the Top and on the Left of the work screen edge. Using the Move Tool, simply click inside the ruler and while holding the left mouse key down drag a Guide Line to where you want to position it. We are going to position four Guide Lines on the inside centres of the circle. Simply drag these over the top, bottom and left and right sides of the postmark's outer circle, effectively creating a square around it.
In the image below, the red lines show where the Guide Lines have been dragged from, left for vertical and top for horizontal. The small red arrows point to where the Guide Lines have been positioned on the postmark's circle. If you have zoomed in far enough, you can carefully place each guide line into the centre of the postmark's outer circle line.
Uploaded files:
Quote from Steve on September 17, 2020, 5:44 pmPHOTOSHOP ELEMENTS POSTMARK TUTORIAL 6/9
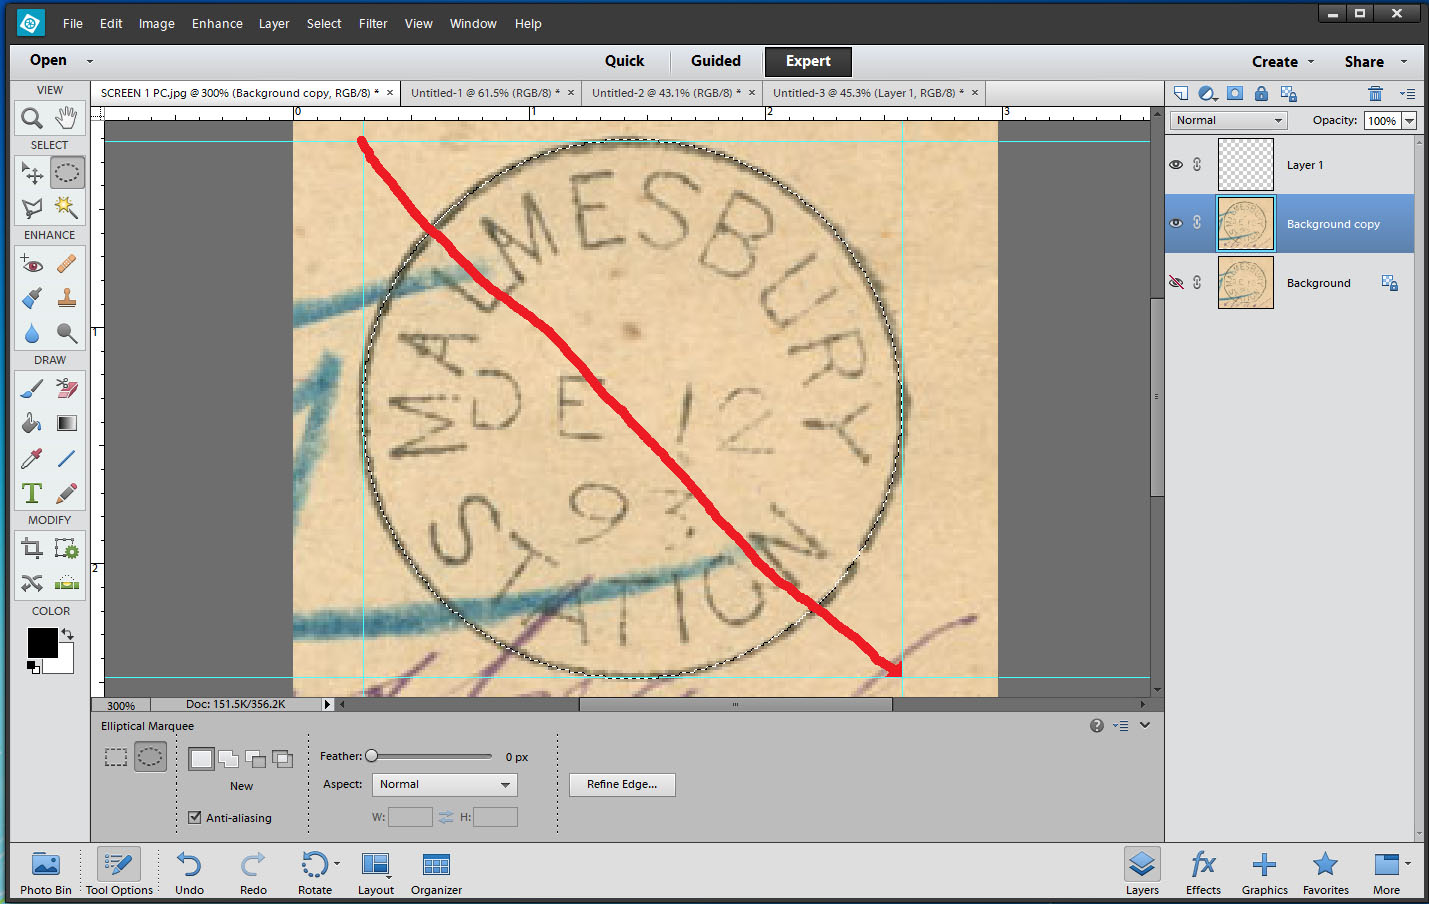
6]. Grab Circle Drawing Tool.
The Circle drawing tool is properly called the Elliptical Marquee. As such, it can draw circles and ellipses. (Are you thinking dated town ovals and cachets? You should be! It can do both with some jiggery-pokery!)The Elliptical Marquee is found in the SELECT Toolbar (left). By default, it is not shown unless you are using it. It is the sibling of the more widely used Rectangular Marquee and lies hidden beneath it.
To access the Elliptical Marquee, click on the Rectangular Marquee with your Right Mouse Button.
The Elliptical Marquee appears alongside the Rectangular Marquee in the bottom left of the screen.
Click on the Elliptical Marquee icon with your Left Mouse Button to select it. The cursor turns into a Cross.
You are now in a position to draw a circle.
Position the centre of the Cross in the top left corner of the rectangle you have created using Guide Lines.
Click with your Left Mouse Button and holding the key down drag the ellipse that appears to the diagonally opposite corner of the Guide Line Rectangle. Stll hold the key down, place the centre of the Cross in the bottom right corner of the rectangle and release the key.
A highlighted circle appears in the inside centre of the postmark's circle.
PHOTOSHOP ELEMENTS POSTMARK TUTORIAL 6/9
6]. Grab Circle Drawing Tool.
The Circle drawing tool is properly called the Elliptical Marquee. As such, it can draw circles and ellipses. (Are you thinking dated town ovals and cachets? You should be! It can do both with some jiggery-pokery!)
The Elliptical Marquee is found in the SELECT Toolbar (left). By default, it is not shown unless you are using it. It is the sibling of the more widely used Rectangular Marquee and lies hidden beneath it.
To access the Elliptical Marquee, click on the Rectangular Marquee with your Right Mouse Button.
The Elliptical Marquee appears alongside the Rectangular Marquee in the bottom left of the screen.
Click on the Elliptical Marquee icon with your Left Mouse Button to select it. The cursor turns into a Cross.
You are now in a position to draw a circle.
Position the centre of the Cross in the top left corner of the rectangle you have created using Guide Lines.
Click with your Left Mouse Button and holding the key down drag the ellipse that appears to the diagonally opposite corner of the Guide Line Rectangle. Stll hold the key down, place the centre of the Cross in the bottom right corner of the rectangle and release the key.
A highlighted circle appears in the inside centre of the postmark's circle.
Uploaded files: