
Tutorial: Creating Postmarks with PhotoShop Elements
Quote from Steve on June 16, 2023, 6:24 pmTUTORIAL - HOW TO RECREATE A POSTMARK IN PHOTOSHOP ELEMENTS - Updated 17/06/2023.
I am often asked how I recreate postmarks. I use Adobe Photoshop Elements 12 (2013) which is now a bit old. Photoshop Elements (PE) is a cut-down version of a more powerful, more expensive professional graphics program.
There have been several updates to PE since I bought my copy for about GBP £79. This old version does everything I need. The updated versions of PE have not added anything I need nor have they significantly altered the look of the software ie. if your version of PE is newer than mine, you should still be able to follow the steps in this tutorial.
Free 30 day Trial. (No credit card required. Instant download. Apparently!)
The Good News is that there is now a 30-day free trial of Photoshop Elements 2023 that will "give you access to all the features," (so says Adobe), "so you can take any feature for a test drive and create incredible photos, slideshows, and animations". This is an improvement on the 7-day free trial in the past. Nor does the price appear to have gone up markedly. (Please cut check this out. Adobe offer Adobe Premiere Elements 2023 for £86.56 incl. VAT and as a bundle with Photoshop Elements 2023 for £130.36.)
NOTE: Many people make the mistake of downloading limited trial software before they are ready to use it. By the time they get around to trying it out, it has already expired.
DO NOT DOWNLOAD THE FREE PE DEMO UNTIL YOU ARE READY TO USE IT.
Depending on where you live, you may be required to download the PE trial from another region. This requirement is a pain in the ass!
UK residents - maybe others - can download a free trial by clicking on this link. Free Trial!
The essential steps in using PE to recreate a postmark are:
1]. Scan the image.
Scanning at 600dpi will allow you to Zoom in at greater magnification later. You need detail if you are to accurately recreate the image (postmark).2]. Crop the Image.
You only require to work on that part of the scanned image that shows all the original postmark.3]. Arrange some Layers.
Think of the top layer as the tracing paper on which you will draw over the bottom Background image.4]. Zoom into the Image
You need to work to the maximim size of the full image on screen in order to get an accurate reproduction.5]. Draw the Circle (s)
This is easi;ly done using Guide Lines and a Circle (elliptical) darwing tool.6]. Zoom into and trace-over the Text
In recreating text you need to see as much detail of it as possible if you are to be at all accurate.There can be many a slip twixt 1 and 6. If you want to attempt to do this, I have expanded on this advice in a step-by-step tutorial, below. It will, hopefully, allow those with PE to learn from my experience which included many mistakes and much frustration while recreating hundreds of Cape and South African postmarks. While there are other software products that you can use to do this, I can only provide you with advice on what I use and know best.
I will shortly also post the Tutorial here as a PDF file.
TUTORIAL - HOW TO RECREATE A POSTMARK IN PHOTOSHOP ELEMENTS - Updated 17/06/2023.
I am often asked how I recreate postmarks. I use Adobe Photoshop Elements 12 (2013) which is now a bit old. Photoshop Elements (PE) is a cut-down version of a more powerful, more expensive professional graphics program.
There have been several updates to PE since I bought my copy for about GBP £79. This old version does everything I need. The updated versions of PE have not added anything I need nor have they significantly altered the look of the software ie. if your version of PE is newer than mine, you should still be able to follow the steps in this tutorial.
Free 30 day Trial. (No credit card required. Instant download. Apparently!)
The Good News is that there is now a 30-day free trial of Photoshop Elements 2023 that will "give you access to all the features," (so says Adobe), "so you can take any feature for a test drive and create incredible photos, slideshows, and animations". This is an improvement on the 7-day free trial in the past. Nor does the price appear to have gone up markedly. (Please cut check this out. Adobe offer Adobe Premiere Elements 2023 for £86.56 incl. VAT and as a bundle with Photoshop Elements 2023 for £130.36.)
NOTE: Many people make the mistake of downloading limited trial software before they are ready to use it. By the time they get around to trying it out, it has already expired.
DO NOT DOWNLOAD THE FREE PE DEMO UNTIL YOU ARE READY TO USE IT.
Depending on where you live, you may be required to download the PE trial from another region. This requirement is a pain in the ass!
UK residents - maybe others - can download a free trial by clicking on this link. Free Trial!
The essential steps in using PE to recreate a postmark are:
1]. Scan the image.
Scanning at 600dpi will allow you to Zoom in at greater magnification later. You need detail if you are to accurately recreate the image (postmark).
2]. Crop the Image.
You only require to work on that part of the scanned image that shows all the original postmark.
3]. Arrange some Layers.
Think of the top layer as the tracing paper on which you will draw over the bottom Background image.
4]. Zoom into the Image
You need to work to the maximim size of the full image on screen in order to get an accurate reproduction.
5]. Draw the Circle (s)
This is easi;ly done using Guide Lines and a Circle (elliptical) darwing tool.
6]. Zoom into and trace-over the Text
In recreating text you need to see as much detail of it as possible if you are to be at all accurate.
There can be many a slip twixt 1 and 6. If you want to attempt to do this, I have expanded on this advice in a step-by-step tutorial, below. It will, hopefully, allow those with PE to learn from my experience which included many mistakes and much frustration while recreating hundreds of Cape and South African postmarks. While there are other software products that you can use to do this, I can only provide you with advice on what I use and know best.
I will shortly also post the Tutorial here as a PDF file.
Quote from Steve on June 17, 2023, 6:49 amPHOTOSHOP ELEMENTS POSTMARK TUTORIAL 1/9 - Updated Updated 17/06/2023.
1]. Scan the image.
You can scan from inside Photoshop Elements (PS) using the File > Import command.This will bring up a Scan dialogue box relevant to your scanner. I have an Epson Perfection 4870 Photo scanner. In PE, the Epson Scan dialogue box offers a wide range of scanning controls, most importantly Image Type (ie. 24-bit Color, etc), Resolution (ie. 600 dpi), Descreening, etc. It also allows you to screen all or part of the image placed in the scanner. After scanning, this Scan dialogue box must be closed before you can contine working in PE.
Alternatively, you can Open a previously scanned image in the File menu.
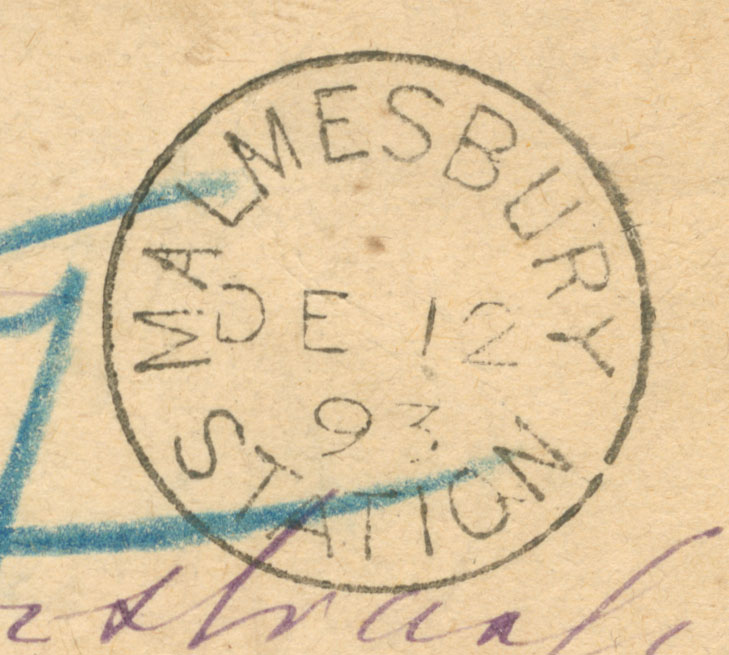
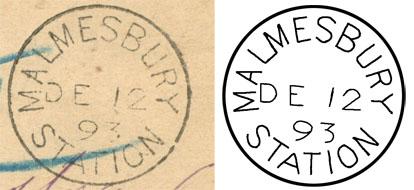
Below top is a postcard whose MALMESBURY single circle datestamp I am going to recreate in PE.
Optional
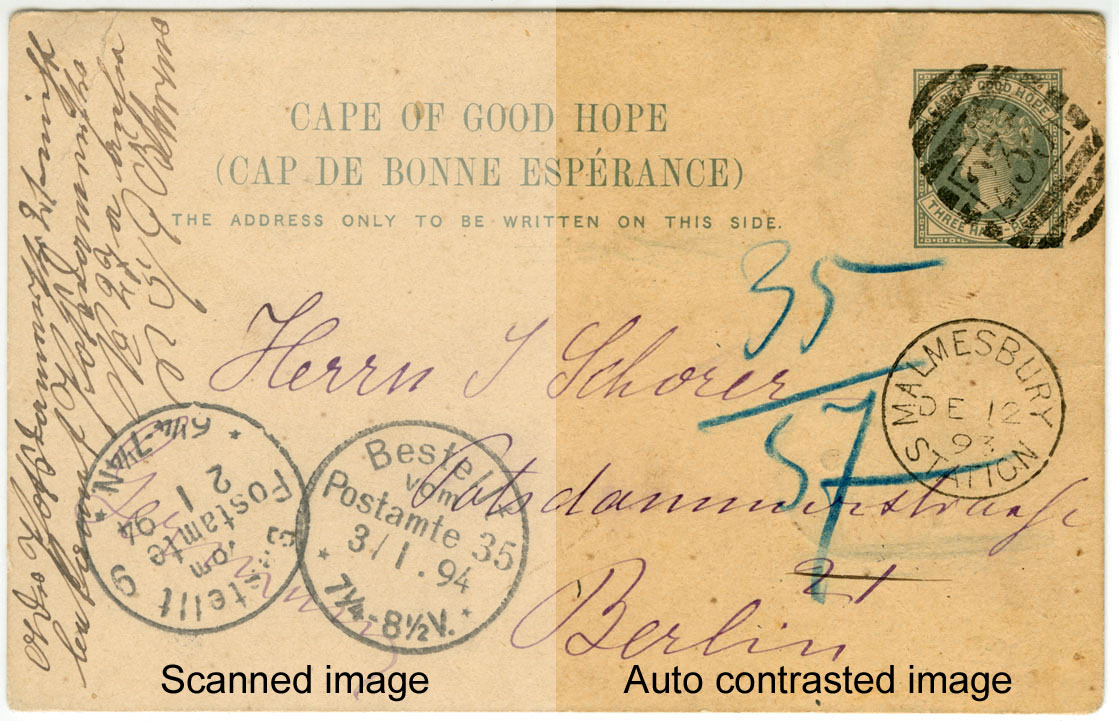
You can make the image 'darker' by using Enhance > Auto Contrast. This will make the backround colour deeper and the postmark outline stronger. I usually use this when I want more contrast in an image. However, it has the effect of making the image look better than it is. (Caveat emptor. Many items sold on-line are contrasted like this.) If you do not like the effect, switch it off immediately with Edit > Undo Auto Contrast.Below bottom is the same postcard on which the right half has been Auto Contrasted.
PLEASE NOTE: If you are doing this tutorial, you can download a high resolution image of the postmark to work on. See next.
PHOTOSHOP ELEMENTS POSTMARK TUTORIAL 1/9 - Updated Updated 17/06/2023.
1]. Scan the image.
You can scan from inside Photoshop Elements (PS) using the File > Import command.
This will bring up a Scan dialogue box relevant to your scanner. I have an Epson Perfection 4870 Photo scanner. In PE, the Epson Scan dialogue box offers a wide range of scanning controls, most importantly Image Type (ie. 24-bit Color, etc), Resolution (ie. 600 dpi), Descreening, etc. It also allows you to screen all or part of the image placed in the scanner. After scanning, this Scan dialogue box must be closed before you can contine working in PE.
Alternatively, you can Open a previously scanned image in the File menu.
Below top is a postcard whose MALMESBURY single circle datestamp I am going to recreate in PE.
Optional
You can make the image 'darker' by using Enhance > Auto Contrast. This will make the backround colour deeper and the postmark outline stronger. I usually use this when I want more contrast in an image. However, it has the effect of making the image look better than it is. (Caveat emptor. Many items sold on-line are contrasted like this.) If you do not like the effect, switch it off immediately with Edit > Undo Auto Contrast.
Below bottom is the same postcard on which the right half has been Auto Contrasted.
PLEASE NOTE: If you are doing this tutorial, you can download a high resolution image of the postmark to work on. See next.
Uploaded files: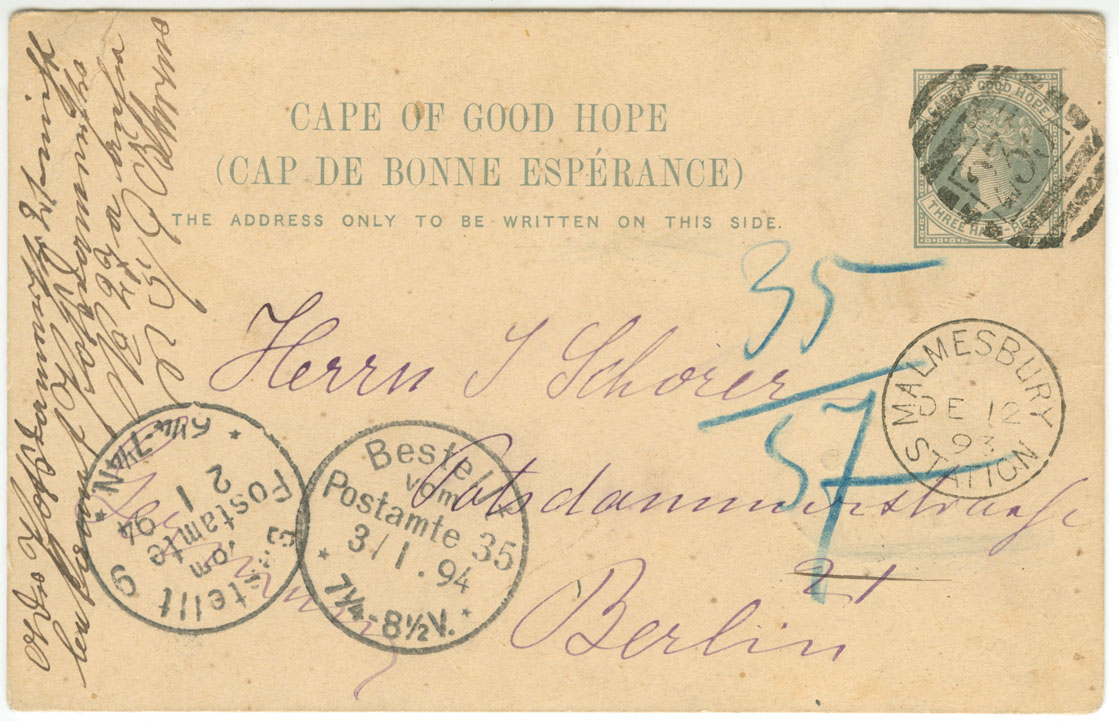
Quote from Steve on June 17, 2023, 6:58 amPHOTOSHOP ELEMENTS POSTMARK TUTORIAL 2/9 - Updated 17/06/2023.
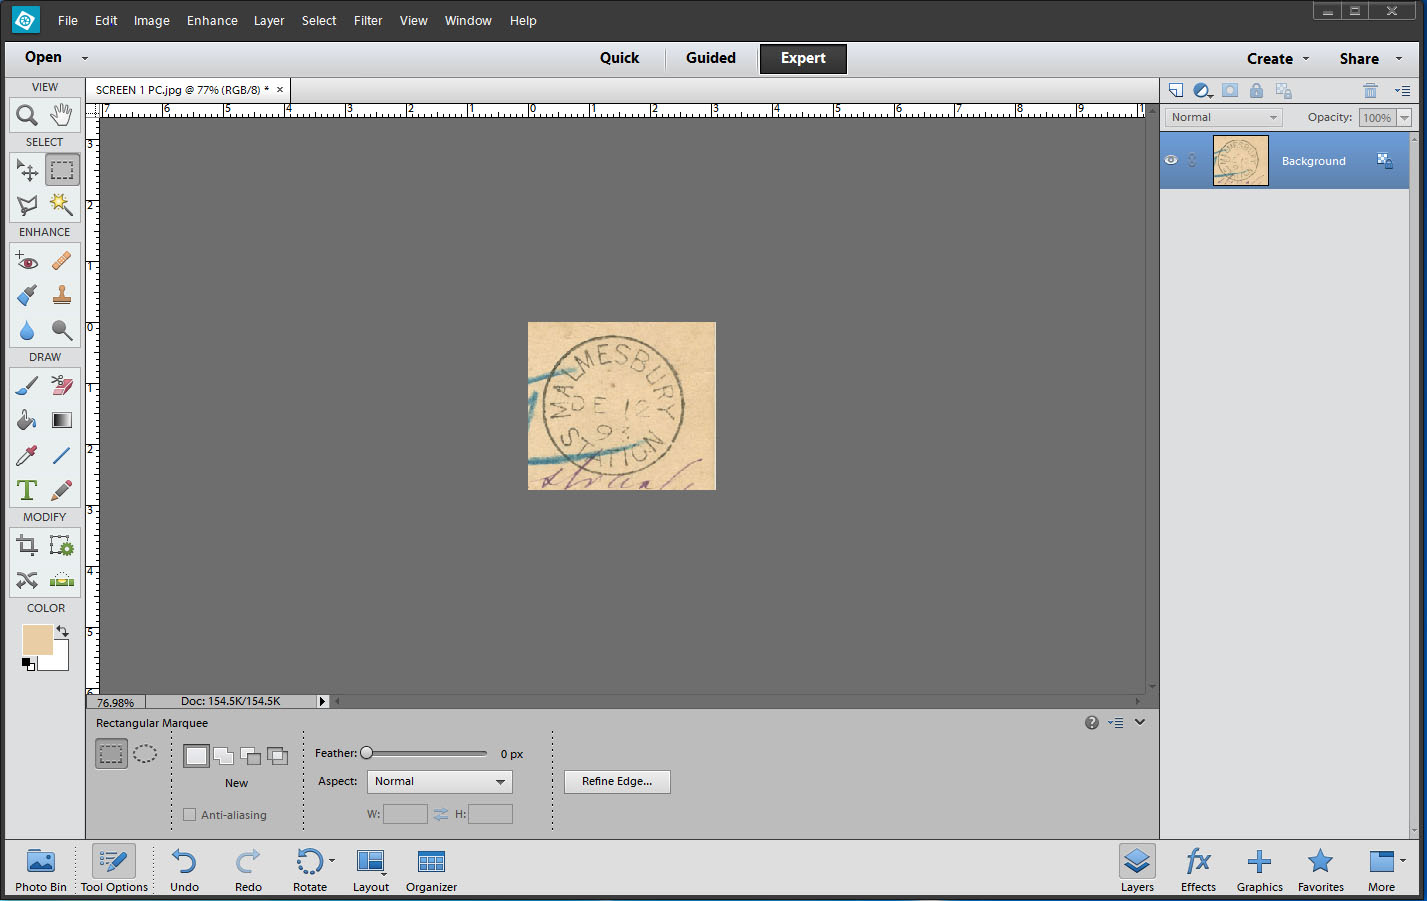
PLEASE NOTE: You can download a high resolution image of the cropped postmark to work on.
How to Download the Image to be used in this Tutorial
Using your Right Mouse key, click on the bottom-most image below showing the cropped scanned postmark.
Click on Save Image As. A standard Windows Save As dialogue box comes up.
Select where you want to Save your image and give it a file name meaningful to you or accept the default.
The image is a 600 dpi 24-bit Colour JPG file. Make a note of where you saved it.
The following tutorial instruction describes how to create the cropped image you have downloaded for use here. READ BUT DO NOT FOLLOW THE INSTRUCTIONS BELOW IF YOU HAVE DOWNLOADED THE IMAGE.
2]. How to Crop the Image.
You only require that part of the scanned image that shows all the original postmark.In the Select Tool Box (top left), select the Rectangular Marquee Tool. Place the cursor to the top left of the postmark and drag a box down to the bottom right around the image to be worked on. Give yourself a little space around the edges.
Once you have placed a box around the Image, select Image > Crop.
You will now be left with the selected area of the postcard containing the postmark.
If an area remains selected, ie. highlighted, you need to switch it off before proceeding. Go to Select > Deselect
Uploaded files:
PHOTOSHOP ELEMENTS POSTMARK TUTORIAL 2/9 - Updated 17/06/2023.
PLEASE NOTE: You can download a high resolution image of the cropped postmark to work on.
How to Download the Image to be used in this Tutorial
Using your Right Mouse key, click on the bottom-most image below showing the cropped scanned postmark.
Click on Save Image As. A standard Windows Save As dialogue box comes up.
Select where you want to Save your image and give it a file name meaningful to you or accept the default.
The image is a 600 dpi 24-bit Colour JPG file. Make a note of where you saved it.
The following tutorial instruction describes how to create the cropped image you have downloaded for use here. READ BUT DO NOT FOLLOW THE INSTRUCTIONS BELOW IF YOU HAVE DOWNLOADED THE IMAGE.
2]. How to Crop the Image.
You only require that part of the scanned image that shows all the original postmark.
In the Select Tool Box (top left), select the Rectangular Marquee Tool. Place the cursor to the top left of the postmark and drag a box down to the bottom right around the image to be worked on. Give yourself a little space around the edges.
Once you have placed a box around the Image, select Image > Crop.
You will now be left with the selected area of the postcard containing the postmark.
If an area remains selected, ie. highlighted, you need to switch it off before proceeding. Go to Select > Deselect
Uploaded files:
Uploaded files: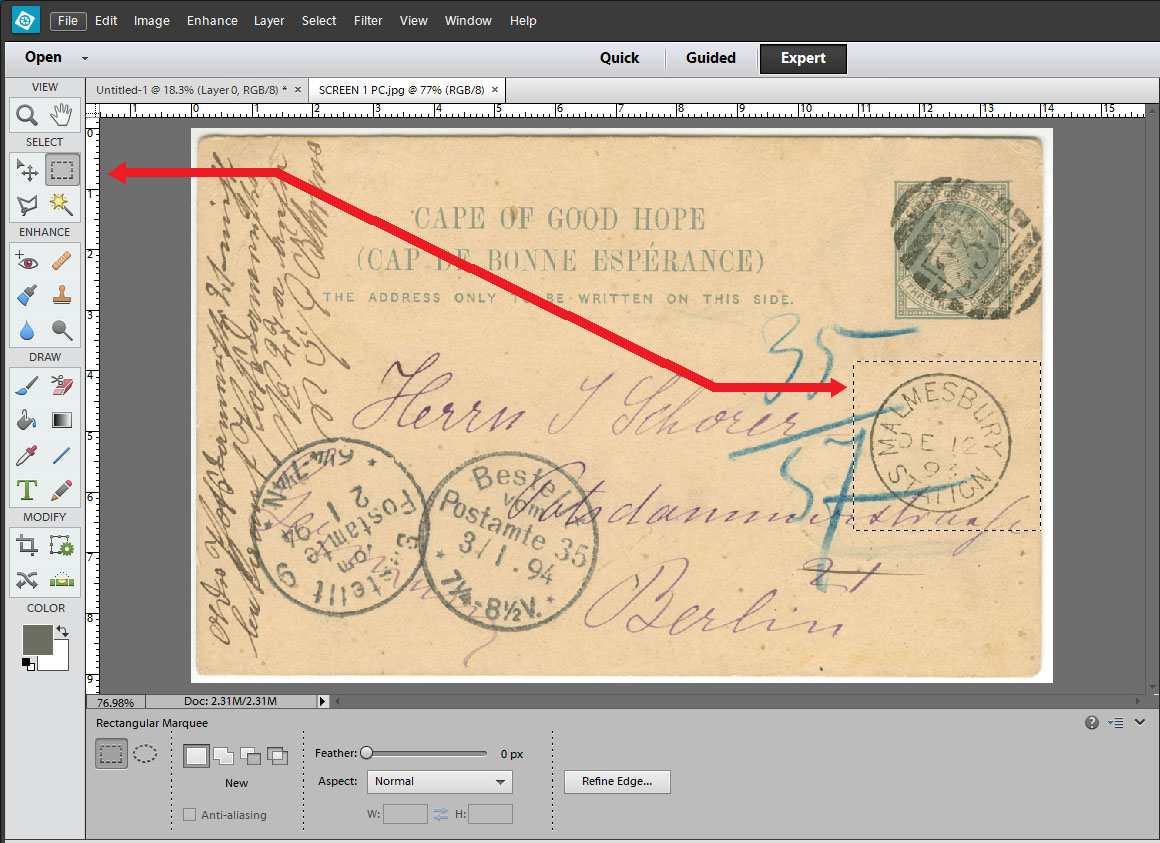
Quote from Steve on June 17, 2023, 7:03 amPHOTOSHOP ELEMENTS POSTMARK TUTORIAL 3/9 - Updated 20/09/2020.
Load the Image you Downloaded.
Refer to your note of where you stored the downloaded file.
Go to File > Open. Click on the image OR specify the path and file name and click on Open.
The downloaded file shows on the workscreen. See top image below. A thumbnail on a blue background appears on the top right.
NOTE: If you cannot see the thumbnail with a blue background at right, go to Window > Layers and click on its layer.
When a layer is highlighted in BLUE its means that it is the active layer which will be drawn on. Generally, you do not want to draw on the Background layer but on a separate layer.
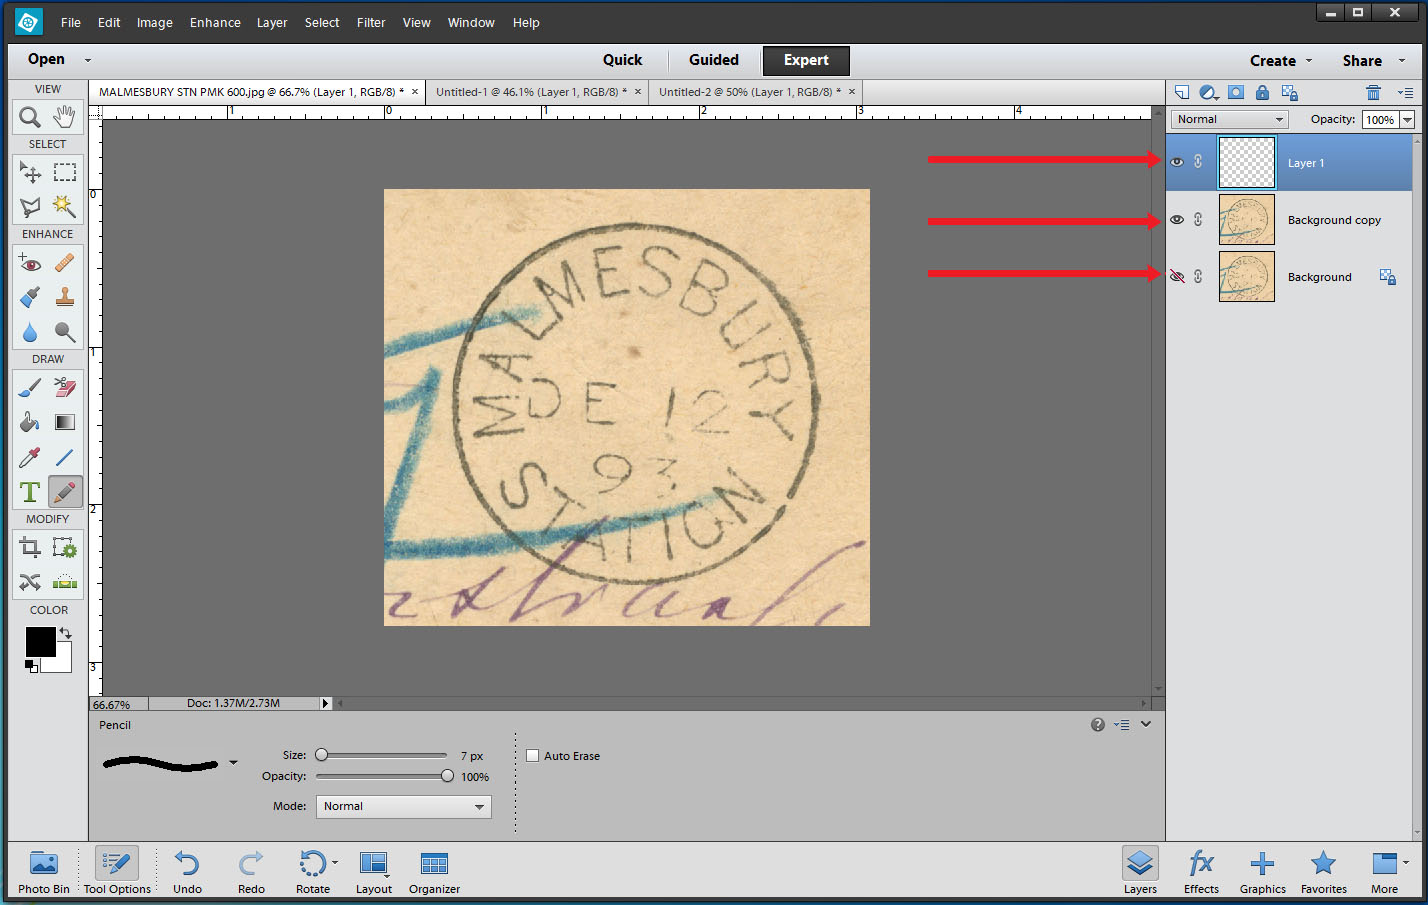
3]. Arrange some Layers.
Using two or three layers will be enough for a simple postmark like this. These will be:Layer 1 (top working copy)
Background copy (traced-over duplicate layer)
Background layer (usually kept locked).When you scan an image or bring one in, it will automatically become the Background layer. You do not want to work on this layer. You want to trace over the image on the Background and be able to extract your tracing separately from it. Layers allow you to do this. They separate your tracing work from the Background. It is a good idea to create a duplicate Background copy layer while keeping the original Background layer locked and inviolate. This will allow you to return to the original image if anything goes seriously wrong.
In the Layer menu, (top), select Duplicate Layer. Accept the default Background copy by pressing OK.
In the Layer menu, (top), select New > Layer and press OK for Layer 1 in the dialogue box that appears.
Layer 1 appears at the top of the Layer Window (right). It is highlighted in BLUE. This means that it is the active layer. If you now draw on the screen ie. trace over the postmark, whatever you draw will now be saved on Layer 1.
Layer 1 also has a checked pattern. This means it is transparent and that you can see what is below it - the Background copy - as you trace over its image which you will be able save separately on Layer 1 after locking the layers below it.
Click on the EYE to the left of the bottom Background thumbnail. A diagonal red line appears over it. The Background layer is now Locked. No work can now be done on it. It will remain pristine. To Unlock a layer, click on the locked red-crossed EYE.
If you now lock both the Background and Background copy layers you will only see transparent Layer 1 with nothing beneath it.
You need to keep a vigilant eye on the layer you are working on. They do sometimes change unexpectedly.
Always check to see that you are still working on the correct layer.
There is a lot more to Layers than this. They are a powerful and useful arrangement tool that can be juggled around to get different effects but for the purpose of copying postmarks you only need the three above.
PHOTOSHOP ELEMENTS POSTMARK TUTORIAL 3/9 - Updated 20/09/2020.
Load the Image you Downloaded.
Refer to your note of where you stored the downloaded file.
Go to File > Open. Click on the image OR specify the path and file name and click on Open.
The downloaded file shows on the workscreen. See top image below. A thumbnail on a blue background appears on the top right.
NOTE: If you cannot see the thumbnail with a blue background at right, go to Window > Layers and click on its layer.
When a layer is highlighted in BLUE its means that it is the active layer which will be drawn on. Generally, you do not want to draw on the Background layer but on a separate layer.
3]. Arrange some Layers.
Using two or three layers will be enough for a simple postmark like this. These will be:
Layer 1 (top working copy)
Background copy (traced-over duplicate layer)
Background layer (usually kept locked).
When you scan an image or bring one in, it will automatically become the Background layer. You do not want to work on this layer. You want to trace over the image on the Background and be able to extract your tracing separately from it. Layers allow you to do this. They separate your tracing work from the Background. It is a good idea to create a duplicate Background copy layer while keeping the original Background layer locked and inviolate. This will allow you to return to the original image if anything goes seriously wrong.
In the Layer menu, (top), select Duplicate Layer. Accept the default Background copy by pressing OK.
In the Layer menu, (top), select New > Layer and press OK for Layer 1 in the dialogue box that appears.
Layer 1 appears at the top of the Layer Window (right). It is highlighted in BLUE. This means that it is the active layer. If you now draw on the screen ie. trace over the postmark, whatever you draw will now be saved on Layer 1.
Layer 1 also has a checked pattern. This means it is transparent and that you can see what is below it - the Background copy - as you trace over its image which you will be able save separately on Layer 1 after locking the layers below it.
Click on the EYE to the left of the bottom Background thumbnail. A diagonal red line appears over it. The Background layer is now Locked. No work can now be done on it. It will remain pristine. To Unlock a layer, click on the locked red-crossed EYE.
If you now lock both the Background and Background copy layers you will only see transparent Layer 1 with nothing beneath it.
You need to keep a vigilant eye on the layer you are working on. They do sometimes change unexpectedly.
Always check to see that you are still working on the correct layer.
There is a lot more to Layers than this. They are a powerful and useful arrangement tool that can be juggled around to get different effects but for the purpose of copying postmarks you only need the three above.
Uploaded files: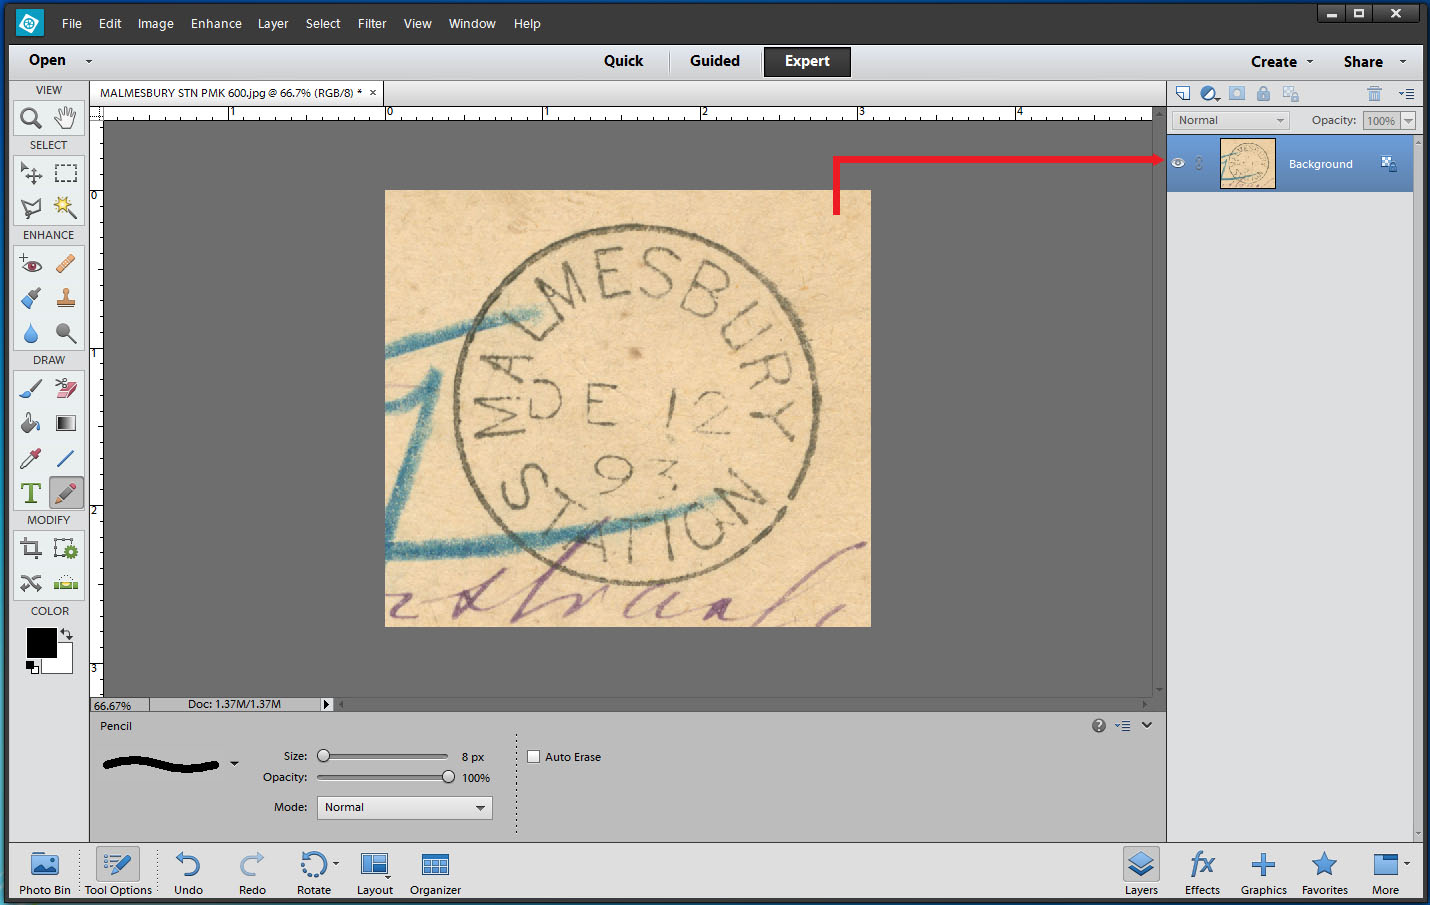
Quote from Steve on June 17, 2023, 9:16 amPHOTOSHOP ELEMENTS POSTMARK TUTORIAL 4/9
4]. Zoom into the Image
Most of you will not need much if any instruction in this.To Zoom In, go to the Magnifying Glass icon top right. Double Click on it once and place it in the centre of where you want to Zoom In. Press your left mouse key until you have achieved the level of magnification you need.
To Zoom Out, click on the Magnifying Glass icon bottom right, (the one with the - minus in the centre), and place it in the centre of where you want to Zoom Out. Press your left mouse key until you have achieved the level of de-magnification you need.
To go back to a full-screen view, go to View > Fit On Screen. This also has Zoom In and Out functions.
In the image below, I have zoomed into the image. I have centred it on the work screen by clicking on the Move Tool, second from top left, clicking within the image so that it is selected and pressing on the keyboard Up direction arrow key until it was in the centre of the workspace.
Using the Move tool, one can drag the image into position. This can be a bit ham-fisted. For small movements, using Move in conjunction with a directional arrow allows for fine adjustments.
PHOTOSHOP ELEMENTS POSTMARK TUTORIAL 4/9
4]. Zoom into the Image
Most of you will not need much if any instruction in this.
To Zoom In, go to the Magnifying Glass icon top right. Double Click on it once and place it in the centre of where you want to Zoom In. Press your left mouse key until you have achieved the level of magnification you need.
To Zoom Out, click on the Magnifying Glass icon bottom right, (the one with the - minus in the centre), and place it in the centre of where you want to Zoom Out. Press your left mouse key until you have achieved the level of de-magnification you need.
To go back to a full-screen view, go to View > Fit On Screen. This also has Zoom In and Out functions.
In the image below, I have zoomed into the image. I have centred it on the work screen by clicking on the Move Tool, second from top left, clicking within the image so that it is selected and pressing on the keyboard Up direction arrow key until it was in the centre of the workspace.
Using the Move tool, one can drag the image into position. This can be a bit ham-fisted. For small movements, using Move in conjunction with a directional arrow allows for fine adjustments.
Uploaded files:
Quote from Steve on June 17, 2023, 9:50 amPHOTOSHOP ELEMENTS POSTMARK TUTORIAL 5/9
5]. Drag Guide Lines
Guide Lines are vertical and horizontal lines that can be dragged and positioned over the image. The default colour of Guide Lines is light blue. I use them to straighten out skew square or rectangular images or re-orientate circles, etc.If you have an image that has been scanned in a skew, you can drag a Guide Line over the top of it and after selecting the postcard by clicking on it, you can Rotate it so that is level or square with the Guide Line in both the horizontal and or vertical plane. You can place a Guide Line over any part of an image that needs to be 'squared up'. However, you can use them for other purposes too, like defining the circumference of a postmark's circle.
Guide Lines are found in the Rulers above the Top and on the Left of the work screen edge. Using the Move Tool, simply click inside the ruler and while holding the left mouse key down drag a Guide Line to where you want to position it. We are going to position four Guide Lines on the inside centres of the circle. Simply drag these over the top, bottom and left and right sides of the postmark's outer circle, effectively creating a square around it.
In the image below, the red lines show where the Guide Lines have been dragged from, left for vertical and top for horizontal. The small red arrows point to where the Guide Lines have been positioned on the postmark's circle. If you have zoomed in far enough, you can carefully place each guide line into the centre of the postmark's outer circle line.
PHOTOSHOP ELEMENTS POSTMARK TUTORIAL 5/9
5]. Drag Guide Lines
Guide Lines are vertical and horizontal lines that can be dragged and positioned over the image. The default colour of Guide Lines is light blue. I use them to straighten out skew square or rectangular images or re-orientate circles, etc.
If you have an image that has been scanned in a skew, you can drag a Guide Line over the top of it and after selecting the postcard by clicking on it, you can Rotate it so that is level or square with the Guide Line in both the horizontal and or vertical plane. You can place a Guide Line over any part of an image that needs to be 'squared up'. However, you can use them for other purposes too, like defining the circumference of a postmark's circle.
Guide Lines are found in the Rulers above the Top and on the Left of the work screen edge. Using the Move Tool, simply click inside the ruler and while holding the left mouse key down drag a Guide Line to where you want to position it. We are going to position four Guide Lines on the inside centres of the circle. Simply drag these over the top, bottom and left and right sides of the postmark's outer circle, effectively creating a square around it.
In the image below, the red lines show where the Guide Lines have been dragged from, left for vertical and top for horizontal. The small red arrows point to where the Guide Lines have been positioned on the postmark's circle. If you have zoomed in far enough, you can carefully place each guide line into the centre of the postmark's outer circle line.
Uploaded files: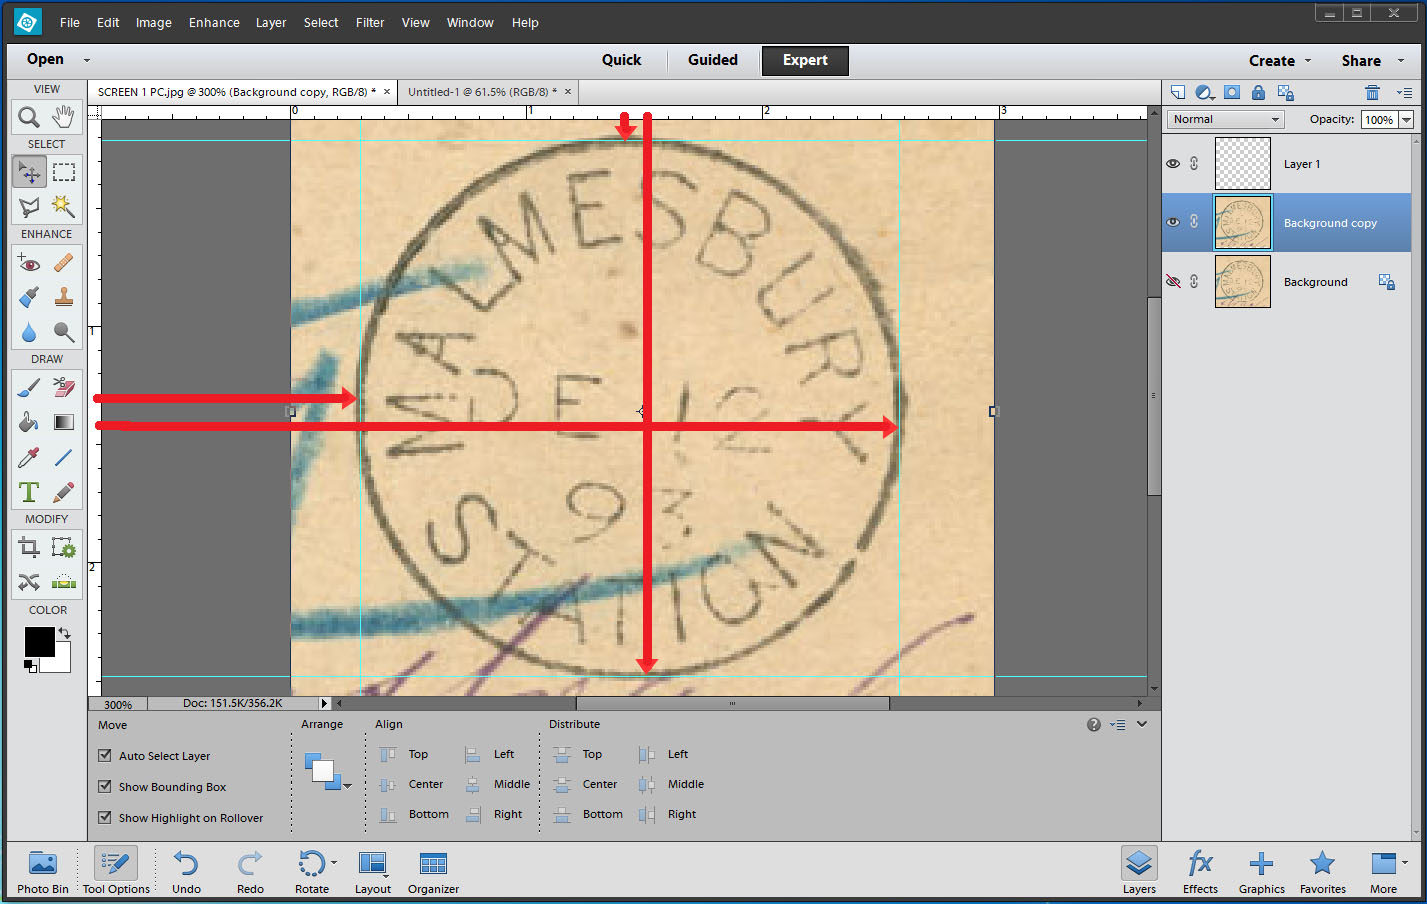
Quote from Steve on June 17, 2023, 10:07 amPHOTOSHOP ELEMENTS POSTMARK TUTORIAL 6/9
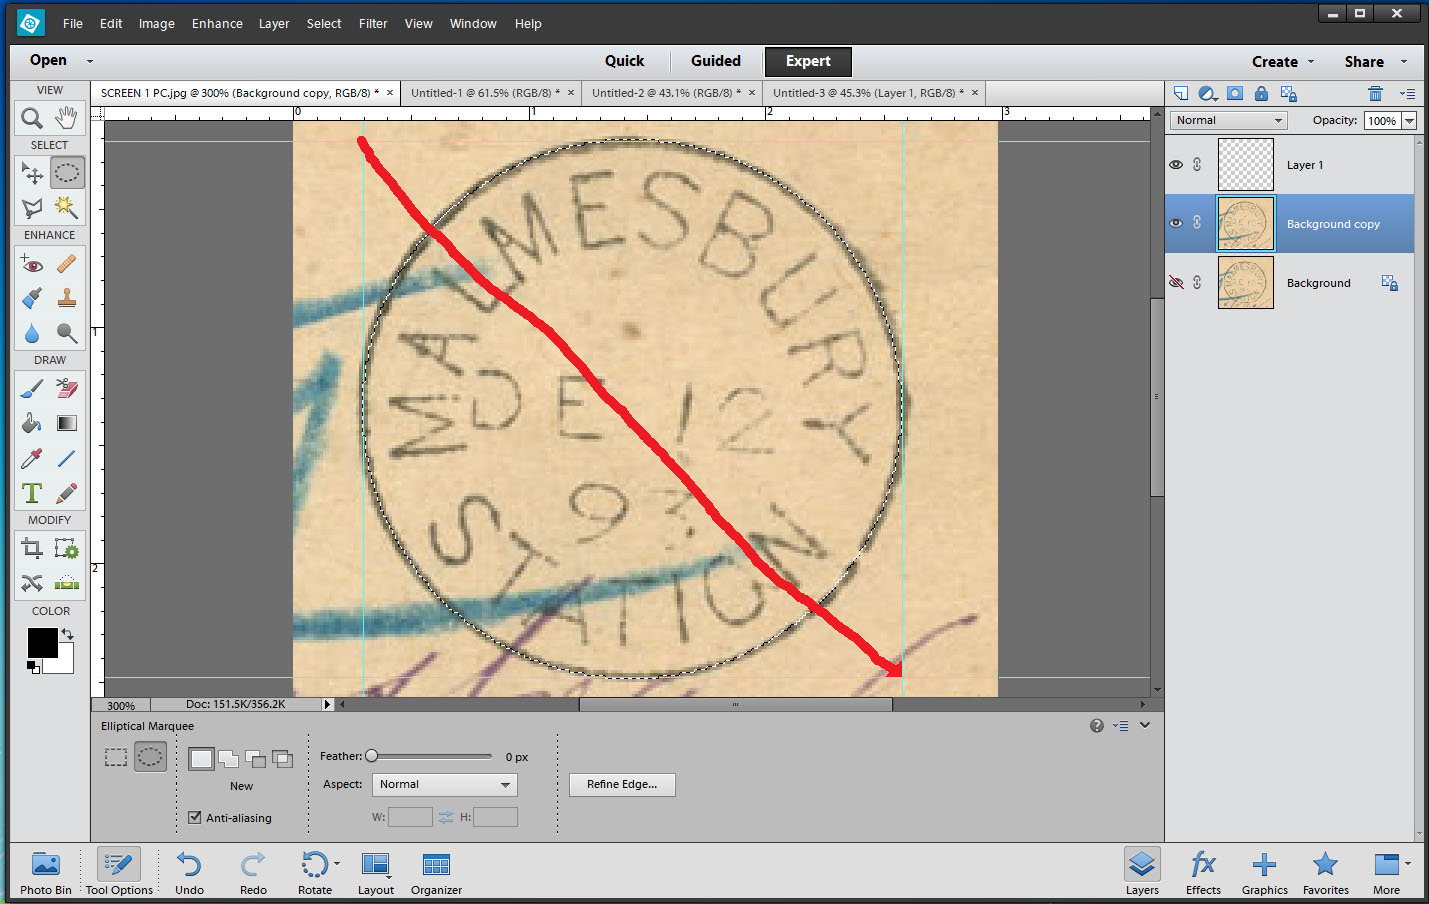
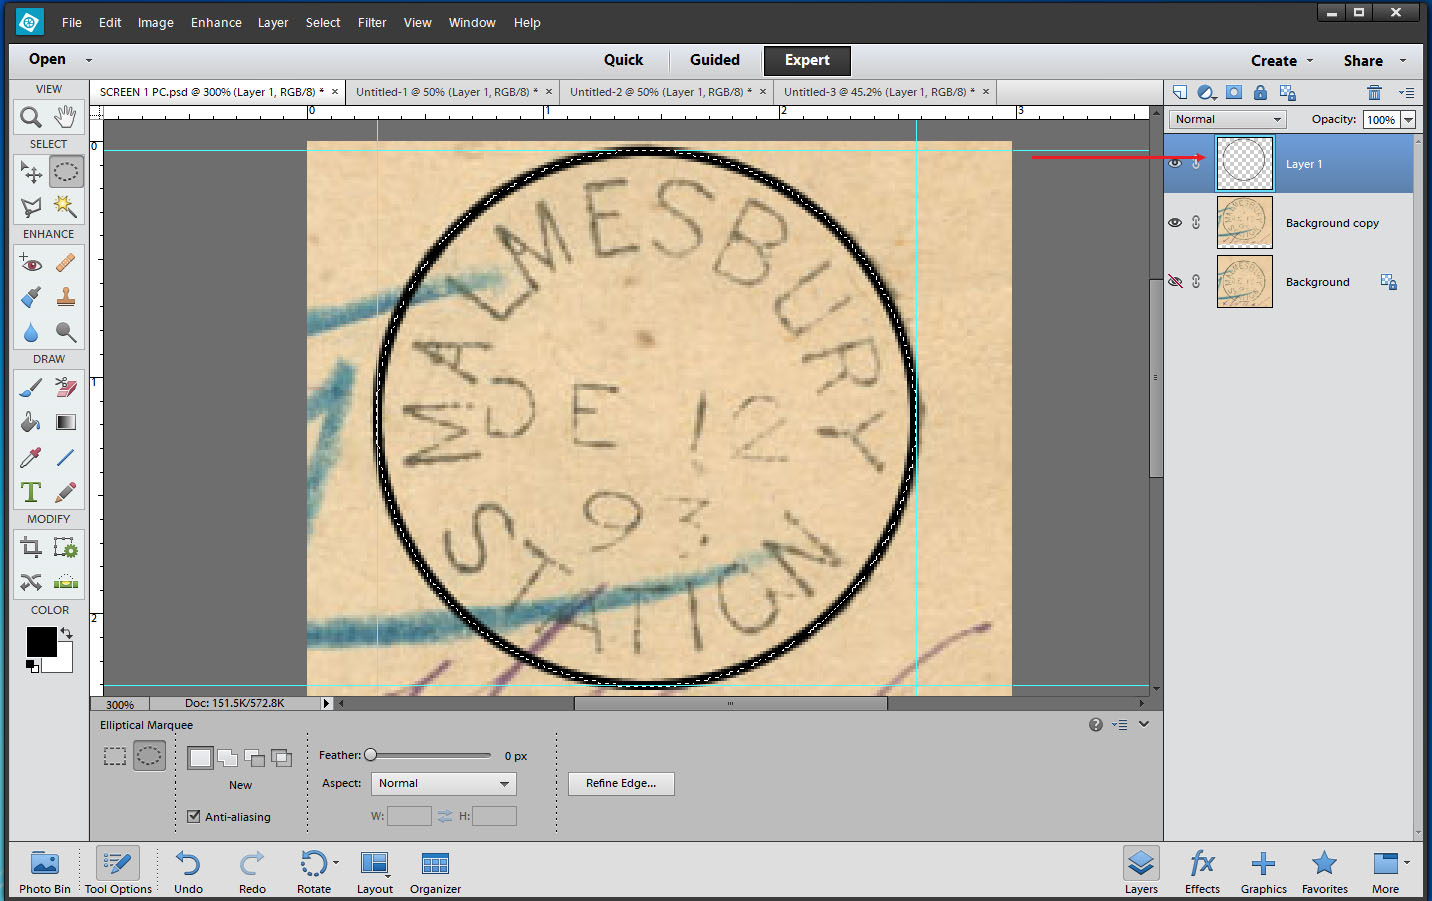
6]. Grab Circle Drawing Tool.
The Circle drawing tool is properly called the Elliptical Marquee. As such, it can draw circles and ellipses. (Are you thinking dated town ovals and cachets? You should be! It can do both!)The Elliptical Marquee is found in the SELECT Toolbar (left). By default, it is not shown unless you are using it. It is the sibling of the more widely used Rectangular Marquee and lies hidden beneath it.
To access the Elliptical Marquee, click on the Rectangular Marquee with your Right Mouse Button.
The Elliptical Marquee appears alongside the Rectangular Marquee in the bottom left of the screen.
Click on the Elliptical Marquee icon with your Left Mouse Button to select it. The cursor turns into a Cross.
You are now in a position to draw a circle from the top left to bottom right of the defined Guide Line rectangle.
Position the centre of the Cross in the top left corner of the rectangle you have created using Guide Lines.
Click with your Left Mouse Button and holding the key down drag the ellipse that appears to the diagonally opposite corner of the Guide Line Rectangle. See bottom image. Stll holding the key down, place the centre of the Cross in the bottom right corner of the rectangle and release the key.
A highlighted circle appears in the inside centre of the postmark's circle.
PHOTOSHOP ELEMENTS POSTMARK TUTORIAL 6/9
6]. Grab Circle Drawing Tool.
The Circle drawing tool is properly called the Elliptical Marquee. As such, it can draw circles and ellipses. (Are you thinking dated town ovals and cachets? You should be! It can do both!)
The Elliptical Marquee is found in the SELECT Toolbar (left). By default, it is not shown unless you are using it. It is the sibling of the more widely used Rectangular Marquee and lies hidden beneath it.
To access the Elliptical Marquee, click on the Rectangular Marquee with your Right Mouse Button.
The Elliptical Marquee appears alongside the Rectangular Marquee in the bottom left of the screen.
Click on the Elliptical Marquee icon with your Left Mouse Button to select it. The cursor turns into a Cross.
You are now in a position to draw a circle from the top left to bottom right of the defined Guide Line rectangle.
Position the centre of the Cross in the top left corner of the rectangle you have created using Guide Lines.
Click with your Left Mouse Button and holding the key down drag the ellipse that appears to the diagonally opposite corner of the Guide Line Rectangle. See bottom image. Stll holding the key down, place the centre of the Cross in the bottom right corner of the rectangle and release the key.
A highlighted circle appears in the inside centre of the postmark's circle.
Uploaded files: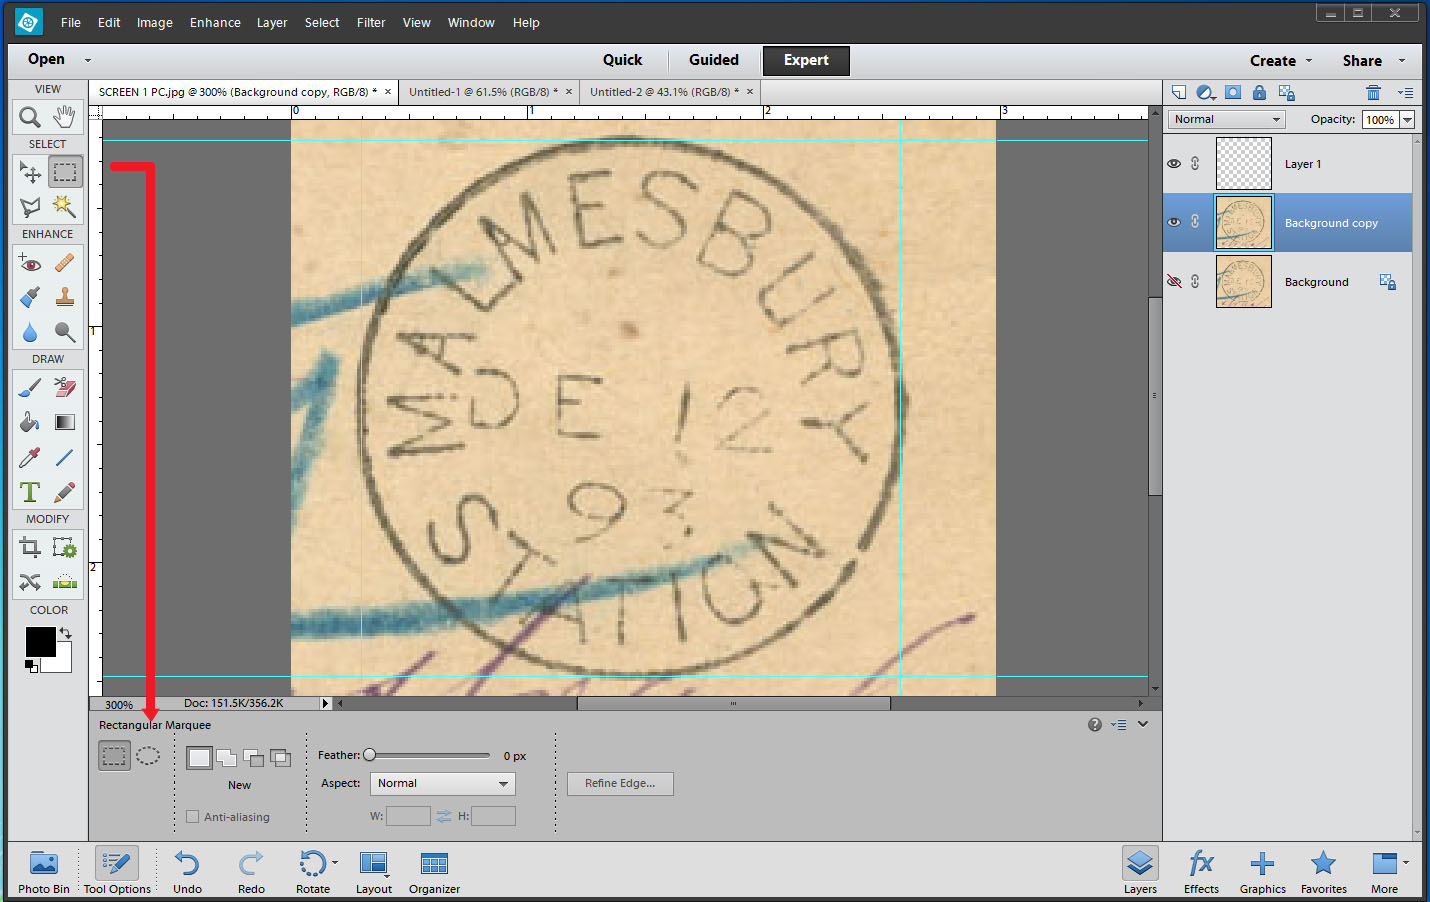
Quote from Steve on June 17, 2023, 10:18 amPHOTOSHOP ELEMENTS POSTMARK TUTORIAL 7/9
7]. Filling in the Circle
Using the highlighted circle as our base, we will now thicken it up and define the colour.Before we do this, we need to ensure that we are working on:
1]. the correct Layer - it must be highlighted in Blue - and
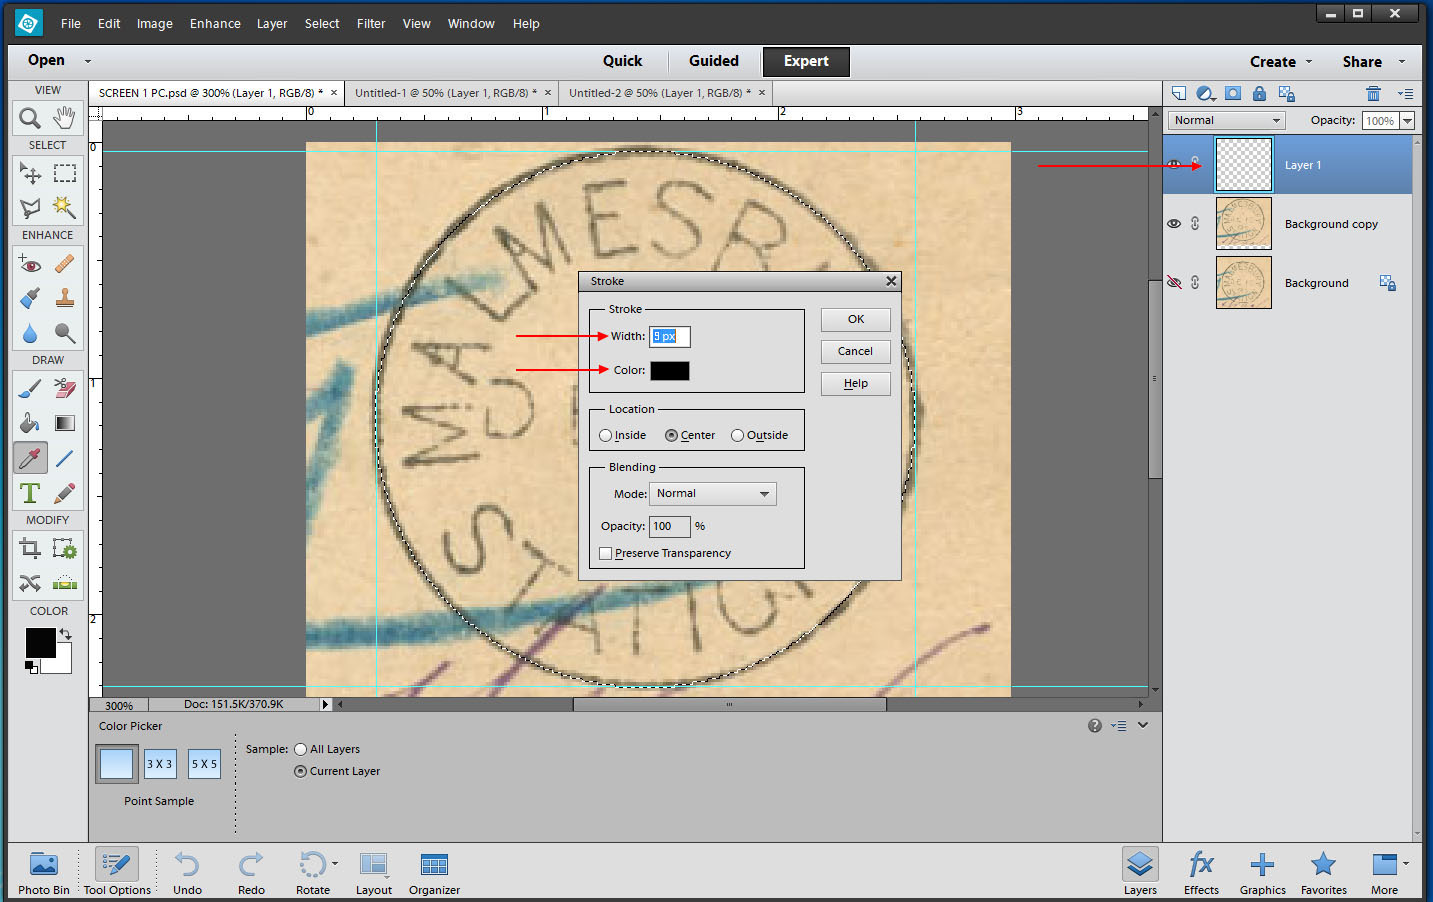
2]. have selected the correct Colour for the circle, typically the default black, (see COLOR, lower left).Go to Edit > Stroke (Outline) Selection. This command allows you to turn the highlighted circle into one of a defined thickness using a selected colour. Colours other than black or dark grey are probably inappropriate for postmarks, unless you are making purple or violet cachets. It is important that the correct colour is selected because you will want to work with one strong colour. Its awakward but not impossible to change later.
When you click on Stroke (Outline) Selection, the Stroke dialogue box appears. See top below.
Set the line thickness to 15 px (pixels) and the colour to Black. Press OK to select this.
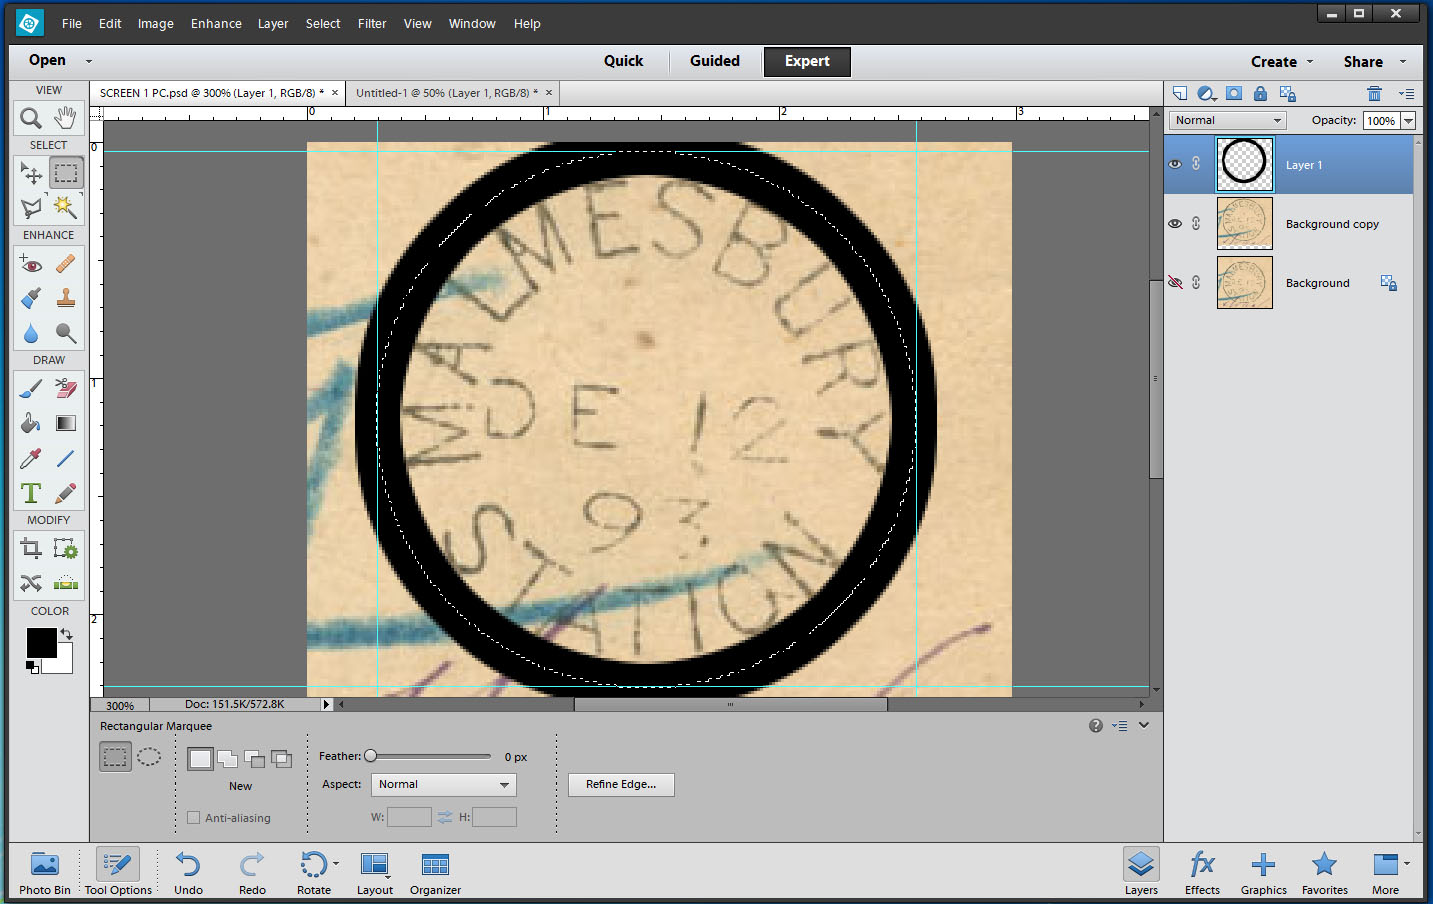
The highlighted circle is turned into a VERY THICK black circle 15 pixels wide. This does NOT match the scanned image.
The thickness of the circle needs to be adjusted. Select Edit > Undo Stroke.
Click on Edit > Stroke (Outline) Selection. The Stroke dialogue box reappears. See the third dialogue box image down.
(If nothing happens, check to see that you are not working on the Background layer. If it is highlighted in Blue, click inside Layer 1 to make it the active later and return to Select Edit > Undo Stroke.)
Set the default line thickness to 9 px (pixels). Press OK to select this.
The result now better matches the original thickness of the postmark. You can see, top right, that it is on its own layer.
The Stroke dialogue box gives you 1 pixel control over the width of the circle. You may want to set it to a lower pixel value in order to more accurately counter the effect of ink spread on paper. However, if all you want to do is recreate the postmark 'as is', this is probably good enough for all but the most demanding postmark purists.
PHOTOSHOP ELEMENTS POSTMARK TUTORIAL 7/9
7]. Filling in the Circle
Using the highlighted circle as our base, we will now thicken it up and define the colour.
Before we do this, we need to ensure that we are working on:
1]. the correct Layer - it must be highlighted in Blue - and
2]. have selected the correct Colour for the circle, typically the default black, (see COLOR, lower left).
Go to Edit > Stroke (Outline) Selection. This command allows you to turn the highlighted circle into one of a defined thickness using a selected colour. Colours other than black or dark grey are probably inappropriate for postmarks, unless you are making purple or violet cachets. It is important that the correct colour is selected because you will want to work with one strong colour. Its awakward but not impossible to change later.
When you click on Stroke (Outline) Selection, the Stroke dialogue box appears. See top below.
Set the line thickness to 15 px (pixels) and the colour to Black. Press OK to select this.
The highlighted circle is turned into a VERY THICK black circle 15 pixels wide. This does NOT match the scanned image.
The thickness of the circle needs to be adjusted. Select Edit > Undo Stroke.
Click on Edit > Stroke (Outline) Selection. The Stroke dialogue box reappears. See the third dialogue box image down.
(If nothing happens, check to see that you are not working on the Background layer. If it is highlighted in Blue, click inside Layer 1 to make it the active later and return to Select Edit > Undo Stroke.)
Set the default line thickness to 9 px (pixels). Press OK to select this.
The result now better matches the original thickness of the postmark. You can see, top right, that it is on its own layer.
The Stroke dialogue box gives you 1 pixel control over the width of the circle. You may want to set it to a lower pixel value in order to more accurately counter the effect of ink spread on paper. However, if all you want to do is recreate the postmark 'as is', this is probably good enough for all but the most demanding postmark purists.
Uploaded files: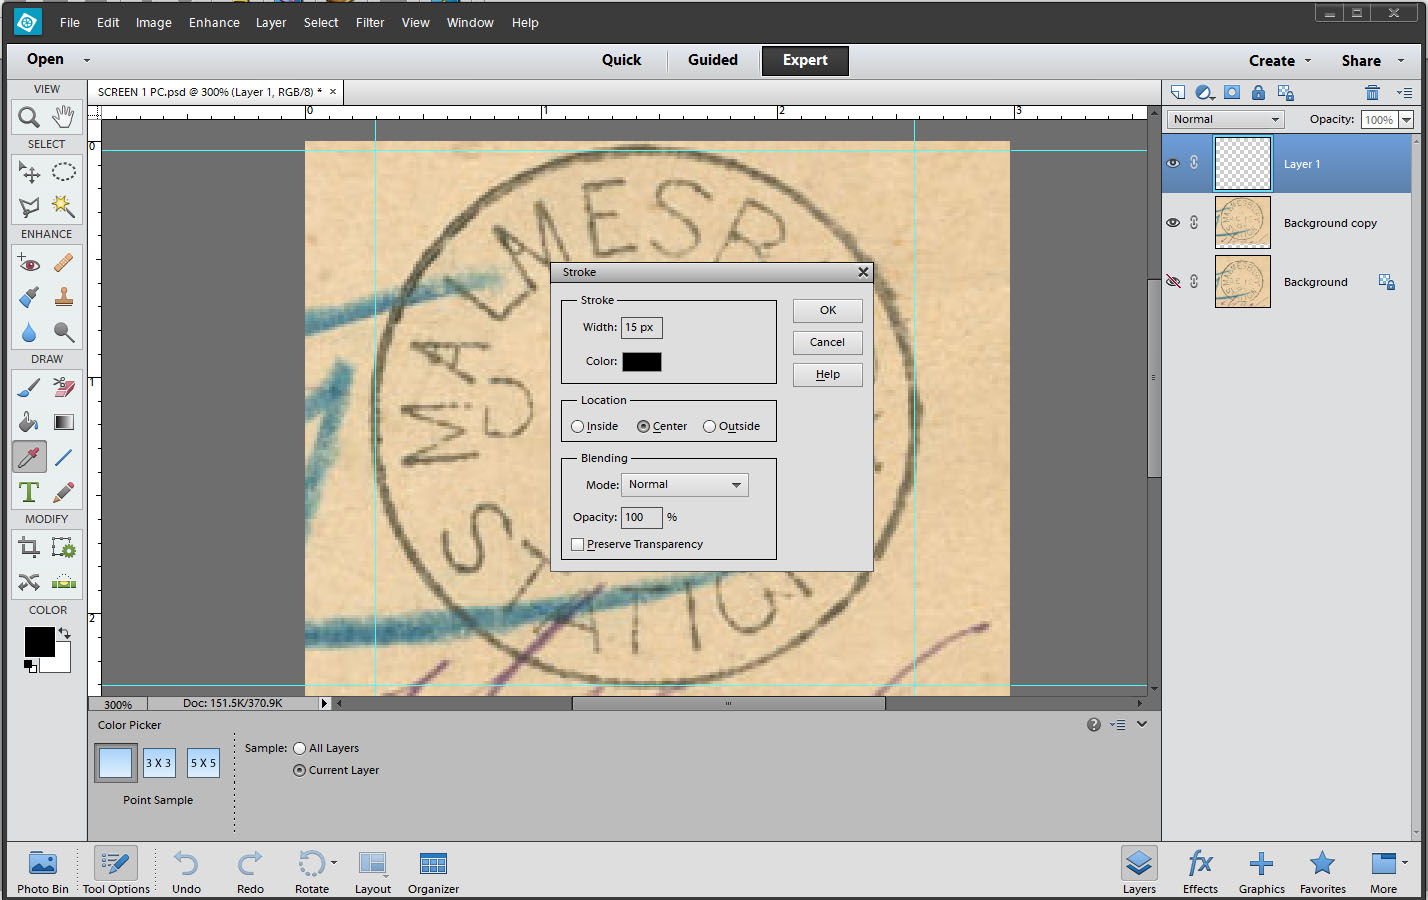
Quote from Steve on June 17, 2023, 10:47 amPHOTOSHOP ELEMENTS POSTMARK TUTORIAL 8/9
8]. Creating Text
Using the Pencil Tool, we will now trace over the text in the scanned postmark.
Before we do this, we need to ensure (AGAIN) that we are working on:
1]. the correct Layer and
2]. have selected the correct Colour for the circle, typically the default black, (see COLOR, lower left).Click on the Pencil Tool. A broken cross with a square in the centre should appear.
Move this Pencil Tool cross to a part of the text that repesents the average text line thickness.
Press the [ bracket to reduce Pencil size.
Press the ] bracket to increase Pencil size.
Keep decreasing or increasing the Pencil size until it fills the width of your selected average text line thickness.
You can now drag the pencil tool over the text to trace it. It is best to work slowly in short sections of tracing. If you make a mistake you can use Edit > Undo to erase it and start that section agani. If you are working in short sections you will not erase all of your work, only the last, wrong part.
As the text of the Date appears to be thinner, reduce the average date line thickness by one or two increment using [.
Once you have completed tracing over the text, switch the Background copy layer off. Click on the Eye.
You can now examine your handiwork. This may have taken you some time to do. I have got this down to about half-an-hour per postmark, sometimes less. Practice will make you better at this. The 'S' shown here is not great. It has too many straight parts. It needs more sinuous fluidity.
PHOTOSHOP ELEMENTS POSTMARK TUTORIAL 8/9
8]. Creating Text
Using the Pencil Tool, we will now trace over the text in the scanned postmark.
Before we do this, we need to ensure (AGAIN) that we are working on:
1]. the correct Layer and
2]. have selected the correct Colour for the circle, typically the default black, (see COLOR, lower left).
Click on the Pencil Tool. A broken cross with a square in the centre should appear.
Move this Pencil Tool cross to a part of the text that repesents the average text line thickness.
Press the [ bracket to reduce Pencil size.
Press the ] bracket to increase Pencil size.
Keep decreasing or increasing the Pencil size until it fills the width of your selected average text line thickness.
You can now drag the pencil tool over the text to trace it. It is best to work slowly in short sections of tracing. If you make a mistake you can use Edit > Undo to erase it and start that section agani. If you are working in short sections you will not erase all of your work, only the last, wrong part.
As the text of the Date appears to be thinner, reduce the average date line thickness by one or two increment using [.
Once you have completed tracing over the text, switch the Background copy layer off. Click on the Eye.
You can now examine your handiwork. This may have taken you some time to do. I have got this down to about half-an-hour per postmark, sometimes less. Practice will make you better at this. The 'S' shown here is not great. It has too many straight parts. It needs more sinuous fluidity.
Uploaded files: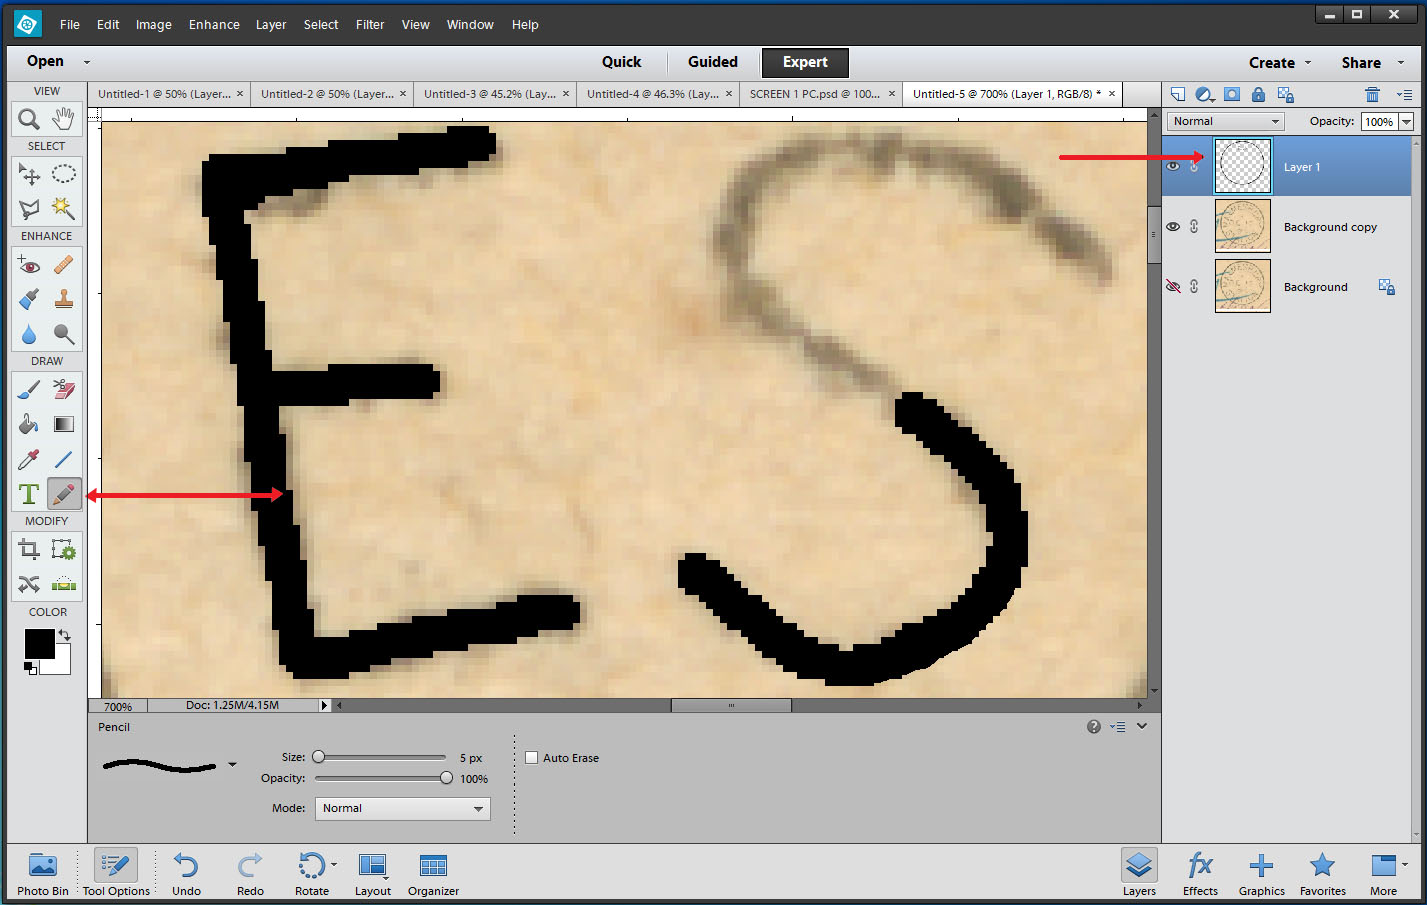
Quote from Steve on June 17, 2023, 11:00 amPHOTOSHOP ELEMENTS POSTMARK TUTORIAL 9/9
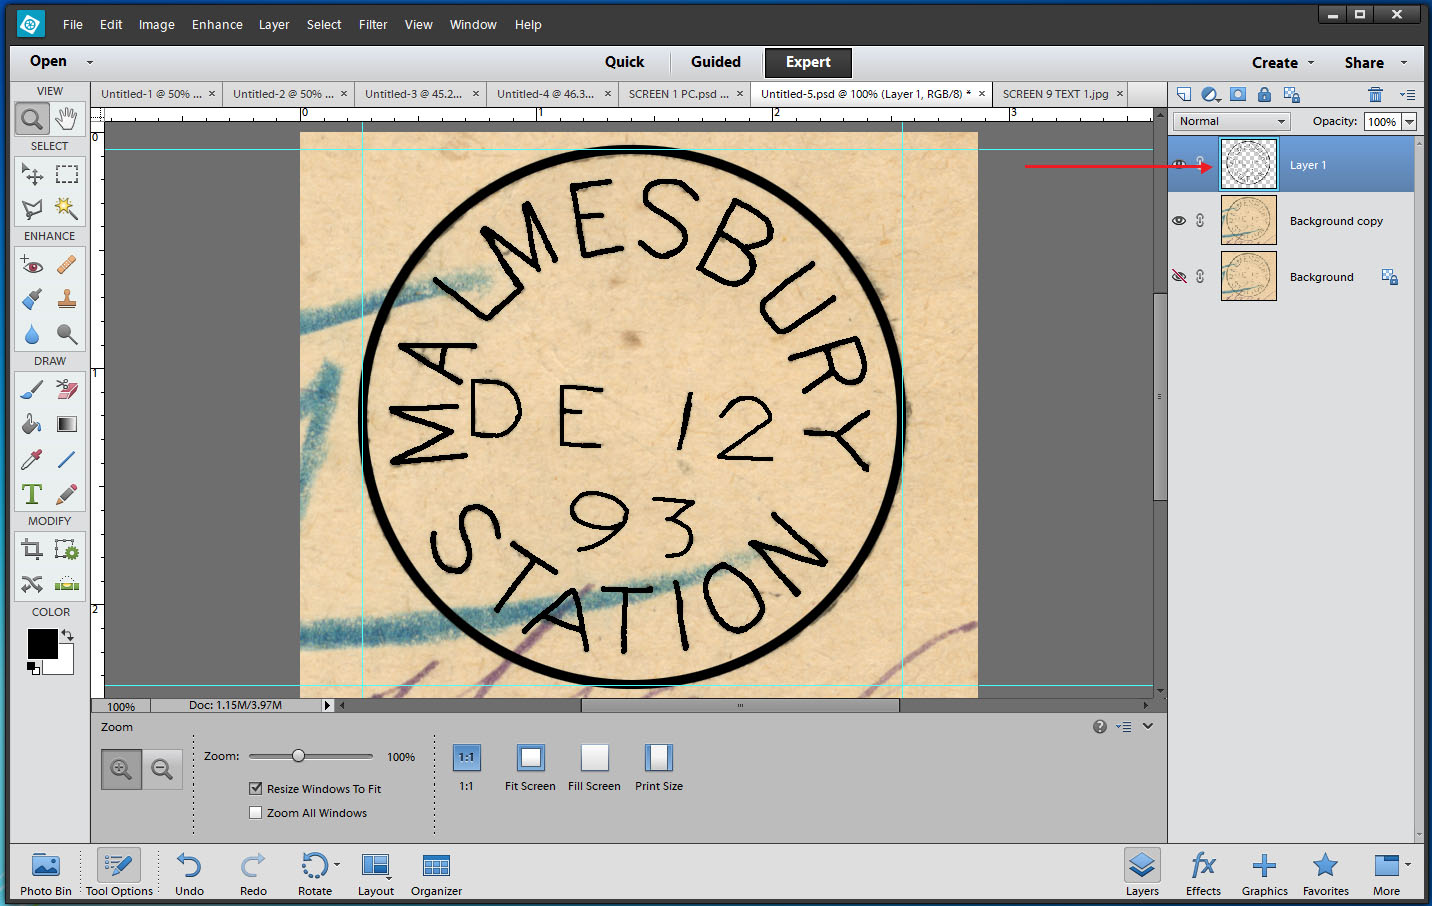
9]. The Ethics of Fine-tuning the Final Result.
There are issues with this result which I am unhappy with. There are parts I want to improve BUT....
One of my drawn S letters is better than the other. Assuming they are they same I would copy and rotate the better one to replace the poorer. However, if you examine the two S's, it would appear that one of them, perhaps the topmost S, has been inserted into the date slug upside-down.
If I was to copy the better S and turn it around to replace the other, the appearance would be improved BUT it will no longer be an accurate reflection of the original postmark. So, I will leave it as is.
Ditto the A's. The one is markedly wider than the other. They may be different types given their different widths. To replace one A with the other would be inappropriate. They must be left 'as is' if they are to reflect the original datestamp. So, again, I will leave it as is.
The O is awkward but it accurately follows what's there to trace over. Yes, I could tidy this up a bit.
THE RULE MUST BE "ONLY EVER REPRODUCE WHAT YOU CAN SEE"!
Never assume what the postmark you are working on should look like. If you working on a postmark that is largely or only partially complete, DO NOT attempt to create what you can't see or imagine should be there. If you do you may create something that never existed. The best solution is to find another example of the same postmark that shows the missing part of your original and then use that to complete the picture. Because of well-documented cases of artist's error, postal historians prefer to see real postmarks however poor rather than reproductions. Nevertheless, I and many others do like to embellish our displays with good, clear and accurate reproductions.
I hope this proves useful. If you have questions while attempting this, I am happy to advise you subject to workload.
PHOTOSHOP ELEMENTS POSTMARK TUTORIAL 9/9
9]. The Ethics of Fine-tuning the Final Result.
There are issues with this result which I am unhappy with. There are parts I want to improve BUT....
One of my drawn S letters is better than the other. Assuming they are they same I would copy and rotate the better one to replace the poorer. However, if you examine the two S's, it would appear that one of them, perhaps the topmost S, has been inserted into the date slug upside-down.
If I was to copy the better S and turn it around to replace the other, the appearance would be improved BUT it will no longer be an accurate reflection of the original postmark. So, I will leave it as is.
Ditto the A's. The one is markedly wider than the other. They may be different types given their different widths. To replace one A with the other would be inappropriate. They must be left 'as is' if they are to reflect the original datestamp. So, again, I will leave it as is.
The O is awkward but it accurately follows what's there to trace over. Yes, I could tidy this up a bit.
THE RULE MUST BE "ONLY EVER REPRODUCE WHAT YOU CAN SEE"!
Never assume what the postmark you are working on should look like. If you working on a postmark that is largely or only partially complete, DO NOT attempt to create what you can't see or imagine should be there. If you do you may create something that never existed. The best solution is to find another example of the same postmark that shows the missing part of your original and then use that to complete the picture. Because of well-documented cases of artist's error, postal historians prefer to see real postmarks however poor rather than reproductions. Nevertheless, I and many others do like to embellish our displays with good, clear and accurate reproductions.
I hope this proves useful. If you have questions while attempting this, I am happy to advise you subject to workload.